Okay, so, I guess I've never told you how old I am or what I do for a living. I am 23 and I am in college. I am also about to graduate. Technically, I should have graduated a year ago, but silly me, I had my rebellious phase during college and it wasn't against my parents, not really. It was against my school's bureaucracy and the series of events that led me to be a management major.
You see, I didn't want to be in the business college. Seeing my mother wrecking her brains and under heaps of stress every quarter convinced me that I didn't want to work like that. Dealing with the problems that come with doing group work and being 'group leader' in grade school told me that I never, ever wanted to be a manager. I wanted to get my bachelor's in SCIENCE. How else was I going to become a mad scientist? Alas, I'm stuck being just a step away from a dirty politician, a management major. I hate management in the corporate business sense. I'm a filthy Socialist Commy, or perhaps, I belong with the likes of Emma Goldman.
If you've played Dungeons and Dragons, you'll understand this phrase: Chaotic Good with Neutral Good leanings. In other words, I'm a motivator for change, progress and enlightenment, unafraid to work in, around and under your machine with the sole purpose of tearing it down so you can see that it's inefficient. I tear conventions down and find a way to make them better. At the same time, I love to help, even if you're my enemy. I can pity a person who doesn't care if I live or die. I can walk up to a random, injured high school kid after they've gotten jumped on by 20 people, stop them from doing the stupid thing and going after their attackers while dabbing blood off them with my ever-present wet-wipes. I know, I've done it before.
But, I'm not a manager, not in the corporate sense, or even the 'I work for the University' sense. I'm not a back-stabber, a brown-noser, or a cut-throat business person... nor do I ever want to be. It's too easy for people to slip into rationalization as a defense mechanism. I know myself. I do it too. When that guy tried to come through my apartment window, I did the rational thing. I called the police, calmly waited for them to arrive and when all was perfectly safe, a report filed, the window repaired and fitted with new bars, that's when I freaked out. In the business world, danger lurks everywhere. It mixes all of the shark-tank exploits of Wall Street with the jealousies and insecurities that some people never grew out of . The business world is like high school, but with no teachers or parents with enough clout over these grown-up children intent on ruining your life. There's no punishment for bad behavior unless it's truly illegal, and sometimes, not even then.
It would be best for me to be conditioned to that sort of lifestyle and behavior. It would be best and even beneficial for me to become a cold, over-rationalizing human-faced monster. I don't want to be that. I don't want to rationalize my guilts for selling people products that could kill them with the idea that I have 'fiduciary duties'. The other thing I don't want is this economic depression.
Yes, depression. The financial folks don't want to call it that, but we've sunk low enough, employment's in the toilet and no new advances have been made. I don't care if we don't look like we did in the depression in the 30s. People had fewer clothing items, food was cheaper and there were still jobs for unskilled labor. Here, there's nothing.
It's a dead zone if you come out of high school and your family doesn't have cash for college. Heck, it's a dead zone if you do. I don't want to be that kid in the L station with their resume strapped to them front and back, asking for a job.
I don't want to become a vagrant contemplating college as an extremely expensive mistake. I want to feel like I can make a difference in the world or at the very least be happily and comfortably successful at something I enjoy. I want to make my parents proud of what I've done with my life. That's why I fear the day's job market, my own unintentional major, and the negative possibilities that may follow. But, that's part of growing up, right?
Monday, December 20, 2010
Thursday, December 16, 2010
Feather Clip Tutorial
If you've ever searched for a glamorous and unique gift for a glamorous and unique Hairphile only to come up empty handed, or flat out broke, this tutorial is for you.
Here are the materials you'll need before you start:
Leather of moderate thickness, no thicker than 3 mm, though.
Feathers
A 1.5 inch long, undecorated snap clip.
White Dressmaker's Pencil
And here are your instructions, with pictures, yo!
Step 1: Draw oval shapes on your leather with your Dressmaker's Pencil. They should be about 2-2.5 inches long . Cut them out.

With that all wrapped up, I should probably do the Etsy Shop of the Week... Especially since I forgot to last time.

Here are the materials you'll need before you start:
Leather of moderate thickness, no thicker than 3 mm, though.
Feathers
A 1.5 inch long, undecorated snap clip.
White Dressmaker's Pencil
Scissors
Exacto-knife
E-6000 Glue
Other embellishmentsAnd here are your instructions, with pictures, yo!
Step 1: Draw oval shapes on your leather with your Dressmaker's Pencil. They should be about 2-2.5 inches long . Cut them out.

Step 2: Draw 4 horizontal lines on your oval. I use a special order to make sure I space them according to the hair clip size so that the leather won't interfer with the snap-clipping action. Draw the first line about half an inch from the top of your oval. The second line should be about 1/4 of an inch down from the first. The third should start a half inch down from the second and the 4th should be 1/4 down from the third. Easy? Easy.
 |
| The lines are faint, but there. |
Step 3: Use your exacto knife to slice along the lines with a firm and even pressure. Don't slice like you're the serial killer in a slasher flick, slice like you're the plastic surgeon working on the face of a model who retired after someone threw acid in her face. VERY carefully. You may have to repeat in order to slice completely through your leather. Be patient. Neat lines will make all the difference when you start really working with this. In the end, you should have 4, straight and even slits
 |
You can see the end of my pinky poking out of one of the slices.
|
Step 4: Unsnap your snap-clip and thread it through the slits you've made. Start with the second slit, pushing the pointed end of the clip through it. Weave it through the remaining slits much like you would weave those pieces of construction paper together in grade school to make place mats. Once finished with that part, take the rounded back end of the clip and work it up through the first slit. Adjust the clip so that it rests evenly in its leather flap. When you're done, the rounded end of the clip should poke out of the 'top' of the leather flap, while the pointed end should poke out of the 'bottom' of it. Actually the pictures for this tutorial are a little off. I was rushing. The pointed end of the clip should come out of the rounded end of the oval.
 |
| Observe as I take a picture with my shaky hands whilst gluing |
Step 5: Leave the clip unsnapped. This will keep you from accidentally gluing your clip SHUT. That'd be a bummer. Glue the rounded end of the clip to the leather underneath it. Be careful not to get glue on the underside of the clip. Now, glue the pointed end to the leather above it. Again, make sure not to get glue on the other parts of the clip. You will regret it. Press the leather against the two ends to help secure it and leave the clip to dry a bit- I usually wait about 30 minutes to an hour.
 |
| Actually, the clip should be put in the other way around. Having the rounded end of the clip at the rounded end of the oval leads to you having a face full of feathers. |
Step 6: Snap your clip shut. If it's dried enough, the leather will not snap off the ends you glued it to. If it's not dried enough, press the leather against the ends of the clip again and allow it more drying time. Start gluing on your feathers, beginning from the outer edges and working your way in. Be sure to draw even, lines of glue over the leather parts of the clip from top to bottom.
 |
| I have added the red feather. |
Step 7: Add a second layer of feathers for fullness. It's tricky to glue the second layer on. The original layer of feathers may shift. Just push them back in place. Make sure that if there are portions of the hair clip base showing that you cover those with feathers. Allow the clip about 30 minutes to dry for a bit.
 |
| I added a layer of red feathers, and then a few black ones for decoration. |
Step 8: Allow the clip about 30 minutes to dry for a bit. Add any other embellishments you want to finish off your feather clip. In this one, I used sequins and a fancy de-shanked button. Let the clip dry COMPLETELY, usually for about 10-24 hours. Now the glue has cured and the clip is wearable. Enjoy.
 |
| The finished product. I do recommend trimming any visible glue from the clip so it looks professional. This is just a quick hack job. The real clip looks MUCH better. |
With that all wrapped up, I should probably do the Etsy Shop of the Week... Especially since I forgot to last time.
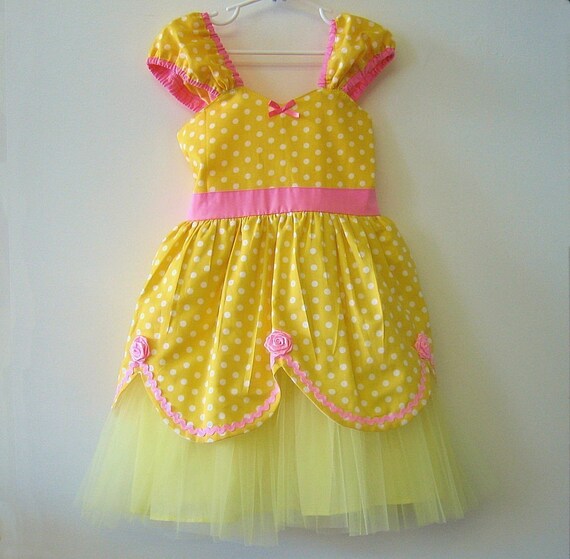
This week's feature is LoverDover's, a children's dress and adult apron shop styled after the fashions of the early 20th century! The whole shop looks like it was born in the era of 'I Love Lucy', splashed through the psychedelic colors of the 70s, and tripped into a 50's diner. I LOVE IT. This is a 'definitely' for any retro housewife and/or kitchen diva. Take a look at my choice picks!
Little Red Riding Hood Dress
 |
| Cape and Blouse are sold separately in the shop. Dress comes with a little blue apron |
I Love Lucy Apron
 |
| Front |
Belle Princess Dress
Thursday, December 2, 2010
Funky Stretch Bracelet Tutorial
For this week's 'episode', I'll be instructing you guys on how to make a cute bracelet worthy of gifting! All you need is some stretchy cord, bugle beads, bicone beads, stringing glue and about 20-45 minutes of your time. I know that's a big time gap, but to be honest, it takes people longer to do this sort of thing on their first couple of tries. Once you get the rhythm, Ooooooh baby, it won't take you long at all. I can actually make 3 of them in 45 minutes now.
Anyways, here we go! Take a look at your materials!
Stretchy Cord

Bugle beads

Bicone Beads

Stringing Glue

Measure a length of stretchy cord 3.2 times your desired length. Don't look at me like that, YES it has to be that long. Now, start with 4 beads in the following order- bugle, bicone, bugle, bicone.

Step 2: Move to your next row
This step is 'tricky' or so I've been told. Take the end of the string opposite your last bicone and put it through the hole of the bicone that the first string exits The result should look like this:
 If it looks like this,

you put the string through the wrong hole! Pull it back out and put it through the other hole. Pull taut.
Step 3: Continue the trend!
Place 2 beads on one strand in the order: bugle, bicone. Then place on bugle bead on the opposite strand. Work the bugle strand through the 'exit wound' of the bicone (ONLY the bicone) on the opposite strand, just like you did in Step two. Pull taut. You see how this is going? Yeah? Repeat until you get close to your desired length.
 Step 4: Finish it!
Stop a centimeter or so shy of you desired length. If you keep going, you'll have a loose floppy bracelet, not a stretchy one! Make sure the end of your chain has no bugles on the free strands. Now, place a bugle on each 'free' strand. See, that? Yes, I know I contradicted myself, but I'm doing it so you don't make the mistakes I did. Now, pull those strands through your FIRST bicone, you know, the little guy you put on between the two bugle beads at the very beginning of your bracelet! Unfortunately, I don't know how to draw that in MSPaint, so, you'll have to use your imagination.
Pull taut. Tie the strands, double, or triple knot them. Then, apply a small blob of glue for extra hold. Allow the glue to dry. Cut the excess cord as close to the knot as possible. TADA! You're done.
Note: Try using different shapes and styles of beads to get different bracelet effects. You can even make a wavy effect by using bicones of graduated sizes! Experiment with the length of your 'chain' to make rings and chokers too! Just remember, use clasps for the chokers... you don't want to strangle anyone.
Anyways, here we go! Take a look at your materials!
Stretchy Cord


Instructions:
Step 1: Place your first beadsMeasure a length of stretchy cord 3.2 times your desired length. Don't look at me like that, YES it has to be that long. Now, start with 4 beads in the following order- bugle, bicone, bugle, bicone.

Step 2: Move to your next row
This step is 'tricky' or so I've been told. Take the end of the string opposite your last bicone and put it through the hole of the bicone that the first string exits The result should look like this:
you put the string through the wrong hole! Pull it back out and put it through the other hole. Pull taut.
Step 3: Continue the trend!
Place 2 beads on one strand in the order: bugle, bicone. Then place on bugle bead on the opposite strand. Work the bugle strand through the 'exit wound' of the bicone (ONLY the bicone) on the opposite strand, just like you did in Step two. Pull taut. You see how this is going? Yeah? Repeat until you get close to your desired length.
Stop a centimeter or so shy of you desired length. If you keep going, you'll have a loose floppy bracelet, not a stretchy one! Make sure the end of your chain has no bugles on the free strands. Now, place a bugle on each 'free' strand. See, that? Yes, I know I contradicted myself, but I'm doing it so you don't make the mistakes I did. Now, pull those strands through your FIRST bicone, you know, the little guy you put on between the two bugle beads at the very beginning of your bracelet! Unfortunately, I don't know how to draw that in MSPaint, so, you'll have to use your imagination.
Pull taut. Tie the strands, double, or triple knot them. Then, apply a small blob of glue for extra hold. Allow the glue to dry. Cut the excess cord as close to the knot as possible. TADA! You're done.
Note: Try using different shapes and styles of beads to get different bracelet effects. You can even make a wavy effect by using bicones of graduated sizes! Experiment with the length of your 'chain' to make rings and chokers too! Just remember, use clasps for the chokers... you don't want to strangle anyone.
Friday, November 26, 2010
The Makings of Elegance: A Reflection
Since I've been busy crafting a lot of these epicly beautiful and utterly timeless pieces, the nerd in me fixated on the phrases most often uttered when such things are displayed. "That's so elegant!"
My inner linguist takes out her spectacles and asks "Why these words in particular?" What is it that makes one bracelet or necklace elegant and beautiful while the others are just beautiful? So, I set out to answer this question by inquiring amongst my fellows, peers, and elders about the attributes of various things they deem elegant. Here are some of the adjectives I uncovered.
Sparkly Classic Regal Sleek
Stands-out Abstract Simple Dark
You may not think it's very interesting, but I did. The majority of the these words don't necessarily apply to something 'elegant'. For example, a brooch of a 6-inch tall gorilla cast in gunmetal and covered in sparkling rhinestones is dark, somewhat abstract, sparkly and it most certainly stands out, but it's far from elegant. Really, only 2 of the adjectives I've presented aren't words that could just as easily be applied to something that isn't elegant. Regal, Classic. Hmmm.
Typically, something regal is something exuding a kingly bearing. A kingly bearing? How do we see kings? Usually in a positive light...possessing the best and finest things, graceful, polite and well-cultured. So, a regal piece of jewelry is something of the best and finest materials, a graceful form and possessing a non-intrusive, yest still very noticeable air.
The other word, classic, refers to something iconic, easily recognized and generally well-liked. So, a classic piece of jewelry is something easily recognized and usually well-liked. It's most likely something traditional. These words have intrinsic qualities that always align with the notion of elegance.
From this, it's safe to assume that the true aspects that make elegance are how classic and regal a piece is. It has to be something incredibly beautiful, but capable of standing up to time and changing fads, something timeless and genuine. To that, I'd like to add the word 'unique'. Elegance is not something mass produced, but something truly beautiful in its rarity. The diamond solitaire necklace at the very beginning of its use was deemed elegant, but since then, it's been mass-produced, imitated to death and its reputation destroyed. Everyone has one now. It's become easy to overlook. It's elegance has been reduced to an expensive fade-into-the-background accessory.
So, now, I'll take off my nerd hat and bring this topic to... what was it again? Oh yeah, this blog's about jewelry and each post is supposed to give you an interesting take away! Here's some of that take away. Elegance is a quality you want to be applied to yourself and your craft. So, be genuine, unique, classic and stand out from the crowd.
My personal take away is that while having a brand name with a catchy acronym or bright colors seems 'cool', the style and quality of the jewelry I make doesn't fit with that. Long, pretentious names don't work either because my style hops and jumps here and there. Everything I do is limited edition and one of a kind. Everything I do is Nonpareil Joolry.
Thursday, November 18, 2010
Making Christmas, Making Christmas
I've been stressing holiday bootcamp a lot lately and keeping up with it fairly well. I've been able to make a little money, save a little money and plan out possible bought gifts (which I can really afford!) for my close friends and relatives. However, there's usually at least one Ren-Made item in the lot of Christmas gifts. It was when I was perusing my stash that I noticed that I've taken absolutely no time out to make any heartfelt, handmade Christmas gifts for ANY of my family members. Uh... Oops.
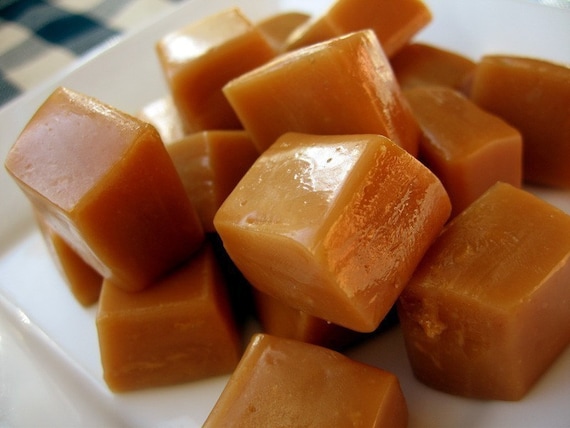
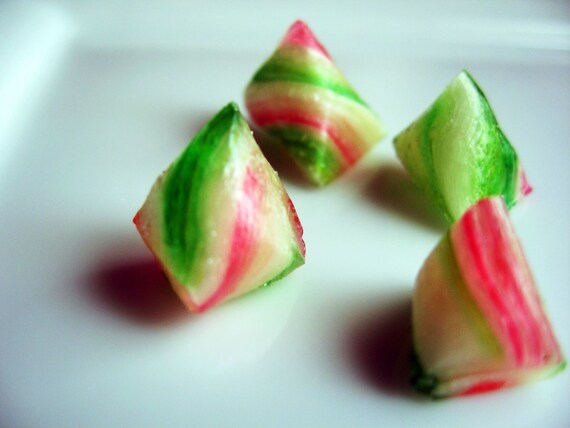
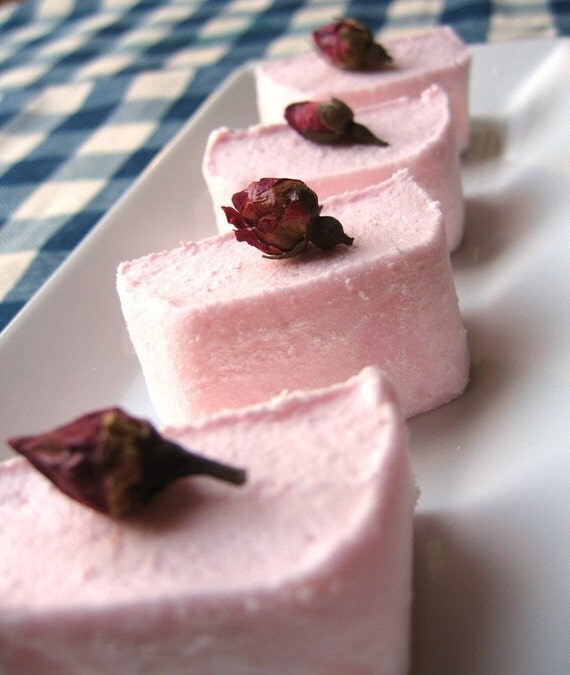
This week's feature is one mouthwatering, jaw-dropping marvel that'll excite your sweet tooth. Fusion Sweets caters to any gourmet sweet tooth's deepest desires. Run by the mother/daughter team of Kay and Angela, the shop offers enchanting new takes on old favorites from marshmallows and butter caramels to traditional hard candies, all in exciting and innovative new flavors. Everything is handmade, organic and flavored with real, all natural ingredients. You can even get custom orders! Here are some of my personal favorites.
Peanut Butter Caramels

Wicked Cool huh? I might get me some of these treats for the holidays!
Then, of course, I overheard some of my sweet aunts randomly chattering about how excited and proud they are about my little side-business and how they've kept up with my deviantart page and can't wait to see what I've made for them for Christmas. Uh.... Oops!
So... Holiday Bootcamp's discipline will now be applied to gift-making and planning. To pacify all THREE of my faithful readers, I'll post a couple tutorials- maybe a reflective piece for you guys to gnaw on while I get busy. All this, it's no big deal, right?
I've still got time and now, NOW, I also have legitimacy. I made my first PURELY online sale a couple days ago. Why is that so important? Well, it's important because that means that all my DA posting and Etsy fiddling and all that enabled me to make someone want to buy something that I MADE simply because it looked good on a photograph. That means, that my stuff looks professional from every angle. That means, I don't have to work myself to sell a product. It sells itself. I feel... lightheaded.
That said, my Etsy Shop is now open for business. There aren't many items RIGHT NOW, but there will be... soon. I'm pacing myself. If I post everything at once, I'll have a mondo huge listing bill and I won't be able to personally sell anything in my inventory. So, for now, I'm plucking out some of my best pieces and putting them up for the possible online market.
And now! Before I forget, our Etsy Shop of the Week!
This week's feature is one mouthwatering, jaw-dropping marvel that'll excite your sweet tooth. Fusion Sweets caters to any gourmet sweet tooth's deepest desires. Run by the mother/daughter team of Kay and Angela, the shop offers enchanting new takes on old favorites from marshmallows and butter caramels to traditional hard candies, all in exciting and innovative new flavors. Everything is handmade, organic and flavored with real, all natural ingredients. You can even get custom orders! Here are some of my personal favorites.
Peanut Butter Caramels
Guava Lemongrass Berlingots
Neopolitan Marshmallows
Rose Infused Marshmallows
Wicked Cool huh? I might get me some of these treats for the holidays!
Friday, November 5, 2010
Gifts Anyone could love
So, you're back for more, huh? You really want to see those things that everyone would find amusing to make the whole awkward 'Getting to Know You' song and dance avoidable, huh? Well, alright, but only because I wanted to share this stuff with you guys anyways!


 With everything from TV remotes stylized like Harry Potter wands to Lightsaber pens to dissolving travel toiletries, Think Geek is your headquarters for all things nerdy and geeky. Most things will be a guaranteed hit with guys because they're full of action, sci-fi guy movie goodness with wicked applications of technology in the most unexpected ways. Hmm.. OOH! They have power inverters! Ahem. Anyway!...


Here are a couple websites that offer cute and unique things for a variety of prices. But, before we get started, let me warn you, as a college student born to an environmentally-conscious middle class family who's mantra is 'haste makes waste', I am the virago of bargain hunting. At the same time, I am the only child, a Leo and rather prone to spoiling myself, so I'm also really keen on good quality. That said here ya go.

1. The Fifteen Dollar Store: $
Yeah, who doesn't love designer stuff for JUST 15 bucks? I know I love it!
2. Sock Dreams: $ through $$
Who would have thought that you could have dreams about socks? Well, I have dreams about THESE socks. The socks at sock dreams are all made from high quality fibers and not only do they have a broad selection of socks that will stand up to the coldest of Chicago Winters, they also have the sexiest knee and thigh-highs I've seen to date.
3. Think Geek:
With everything from TV remotes stylized like Harry Potter wands to Lightsaber pens to dissolving travel toiletries, Think Geek is your headquarters for all things nerdy and geeky. Most things will be a guaranteed hit with guys because they're full of action, sci-fi guy movie goodness with wicked applications of technology in the most unexpected ways. Hmm.. OOH! They have power inverters! Ahem. Anyway!...
4. L'Occitane en Provence: $$ through $$$
As far as wholesome, sustainable luxurious health and beauty goods go, L'Occitane is THE BEST. All of their fragrances, hair care products and body potions are made with all natural ingredients and essential oils. I'm a big fan of their hair products and body creams. My skin and hair have never been this soft and well nourished.
5. eBay: $ to Infinity!
Like you didn't see THIS one coming. Um, can I just say, you can find ANYTHING on eBay! I've gotten everything from white gold and onyx pendants to printer ink cartridges for a fraction of their regular prices on eBay.
6. Retroscope: $$ through $$$
Thinking of doing period costume, or just snagging a few crazy stellar pieces? Retroscope is one of my favorite places to window shop. With their saucy bustle skirts and very feminine ruffled shirts, they have been on my mind since I first heard of them 3 years ago.
7. Etsy: $ to infinity!
I have been quoted time and again that Etsy is the 'rich folks ebay', but even I can't deny that Etsy has some pretty COOL stuff on it. I shop there all the time, for myself and for others. There are all kinds of handmade, one of a kind gifts and 'gifts for you' to be found on Etsy, so don't knock it till you've tried it.
Finally a Featured Etsy seller for you!
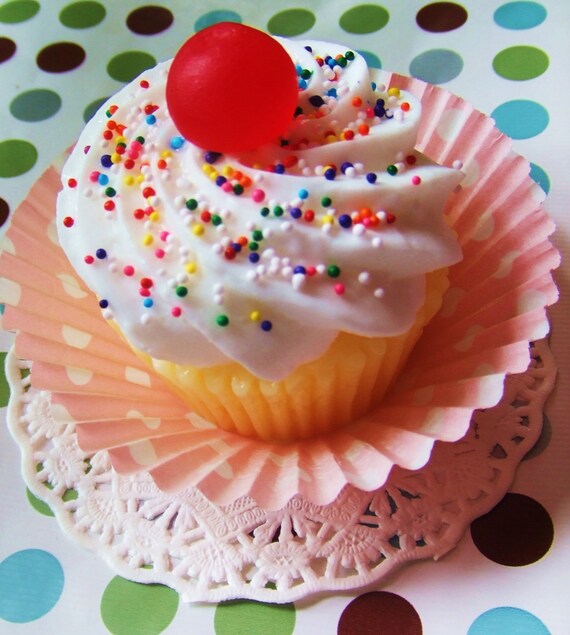
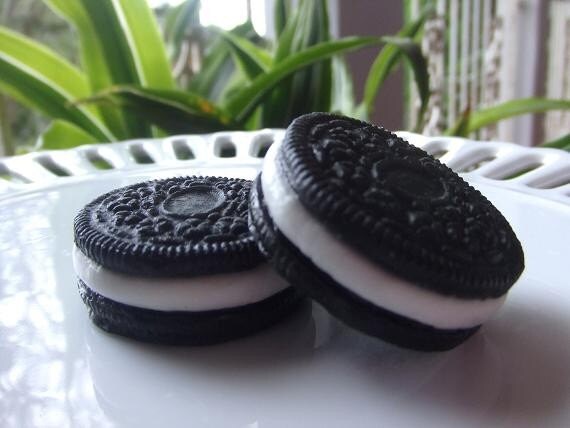
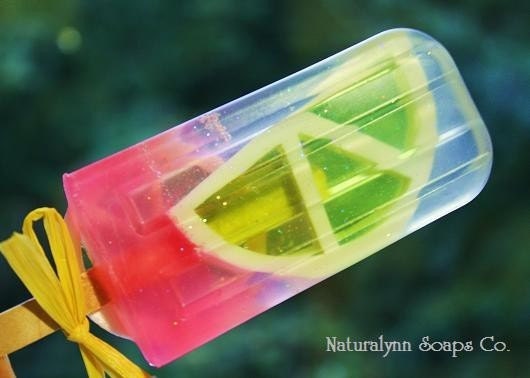
Naturalynn: Featuring handmade soaps in a variety of shapes colors and styles, Naturalynn wraps your body in affordable essential oil infused luxury. Here are a few of my ABSOLUTE favorites
Vanilla Cupcake Soap:
Oreo Cookie Soap:
Cherry Limeade Popsicle Soap:
Making Christmas, Making Christmas
La la la!
I'm making my list and checking it twice. Gonna cross off who's naughty, not nice. Raiding every discount bin in toooown.
It's getting close to Christmas, folks. With all this Holiday Bootcamp Hooplah eating my free time and the sad fact that my 'inventory bin' is ...running over now, I thought it was time to devote some thought to the reason for the creation season, Christmas. It was then that I realized that my aunts kept sending me strange text messages about clothes and CDs and shoes, not because they're weirdos like me who enjoy learning about people for the sake of learning, but rather so they could either get me to obliviously drop hints about things I might want or ascertain what things I might like.
Yes, I am often rather oblivious. I go to conventions and marvel ecstatically at awesome cosplay of Marie Antoinette and Alichino or Malice Mizer conveniently forget WHY I took my camera out in the first place.. Furthermore, I am that scatterbrained person who lamented losing her wallet but then found it in the freezer when she went to console herself with icecream (Don't ask. Please.)
So, it's perfectly normal for me to have my list of Christmas gifts for other people planned out down to the color of the wrapping paper, but to not have thought of a THING to give myself. I even have a little schedule of who I'm going to handmake cards, cookies and trinkets for already lined up and waiting for Thanksgiving break.
Perhaps, you're not as strange and obsessive as me, so you don't have your gifts all plotted out. I decided that it would be a good idea to toss together a sort of guide for people to go bargain or 'interesting find' hunting for their loved ones. So, with that, I'll give you my pillars of buying for gifts.
Children under 10: This is by far the easiest group to buy for. They're wants are simple and usually they'll just tell you. "I want Bratz." "I want Bakugan toys" or the ever famous "I WANT TO BE A MAD SCIENTIST!!!!" You can usually just go hunt in a toy store for these guys. Keep it simple, make sure it's something that they consistently go for and wrap it up cute.
Kids 10+ and Tweens: Kids over ten are a little harder to buy for. They're trying to be like teens, who are trying to be like adults, but they still have some of the affinities of younger children. You can find a happy medium by going with something a little more grown up. Instead of getting them hardcore jewelry, go for something cutesy in bright colors or an outfit like one of their TV idols (kiddie style, of course), or a video game. Most kids in my family start getting their first bits of 'sleek and stylish' technology at this age.
Teens: With the beginnings of more adult thoughts and the greater influx of emotions (and hormones) buying for teens will always be tricky. They have cultures and subcultures, fads and phases, strange mixtures of likes and dislikes and opinions. BOY! Have teens got opinions! But, they can still be bought for. The easiest, no-thought gift you can get for a teen is something electronic, or better yet, one of those American Express or Visa giftcards. It's money on a card they can use ANYWHERE! If you have an idea of your teen's tastes, branching out into CDs, Clothing (Be very careful with this one. They are picky little gremlins), and cool little odds and ends that either have great personal meaning or aid in their quest for self-expression.
One major thing to note about teens is that they have tastes and opinions all set in their minds, much like adults. Unfortunately, they haven't quite acquired the finesse of social BSing that adults have. So, if you buy a teen a glowing Jesus shaped lava lamp clock that belches out bible scriptures every hour on the hour, don't be surprised when all you get in return is a pained grin (read: Grimace).
Twenty and Thirty Somethings: Being among this group, I have a good idea of what they usually want. This group, well, we usually want something fun and quirky. Something snarky, or maybe something thought provoking or technologically savvy. The best gifts for this group usually fall in the realm of private jokes, fond childhood memories, and current hobbies and obsessions. My friend once bought me a riding crop. It was a jibe at my former status as D&D Dungeon Mistress. Even though that thing has brought up more uncomfortable questions and embarrassments than I care to remember, I still keep it in the closet near that fat binder full of D&D monsters and I even take it out for a good laugh every now and then.
Folks 40+: Folks in this age group usually want something of quality, something that shows that they are mature, knowledgeable and still very sexy or funny or whatever they're known for. Yep, the 40+ group has an eye for luxury, but the maturity to still appreciate simpler things. For example, my father ADORES getting laundry detergent for Christmas. I stopped trying to figure out why. My grandfather has always been a coffee lover, so I always buy him the most luxurious coffee I can find and of course, something he'll find funny like a color changing coffee mug. The point is, find their niche, get them something extraordinary, and make sure they know you appreciate their little idiosyncrasies (But don't call them idiosyncrasies. Just...just call them character traits)
In short, Christmas shopping is about knowing the people that you're gifting with! It doesn't take long to pop in and chat about what someone else loves and it's actually not that hard to give a thoughtful gift.
My next post feature random cool crap everyone will love!
Thursday, October 28, 2010
Holiday Bootcamp Week 5
I am reporting on the successes of Operation: Holiday Bootcamp. After a few weeks of fairly diligent work and adherence to the goals of this project, I have fallen off the wagon. I repeat. I have fallen off the wagon. Last week, I couldn't focus on anything other than piecework and am positively swimming in wire-wrapped bead links, nicely composed pendants, and organized projects from the week before. Most of the stuff only needs to have a clasp added before it's finished. This is all really unsettling.
I'm sorry to say this, but it seems my jewelry Muse has taken a hiatus and is sitting pretty in a pile of unfinished components, smirking smugly at me as I try to conjure up the desire to create. I'm completely failing to finish anything. It all seems so lackluster to me. My Muse has fallen to sloth! Sloth is the enemy and must be vanquished to maintain a good Protestant work ethic!
Alas, while the muse of Jewelry is laying around, turning herself into a bloated walrus as she wallows in the supplies she holds so dear, my drawing Muse has stopped being so lazy and decided to allow me to churn out some rather dynamic sketches as well as some potential logo ideas. Here's something I worked on last weekend.

I feel like the background is missing some depth... I'm still new to doing backgrounds, so I'm not entirely sure how to go about fixing it. Any suggestions?
Thursday, October 21, 2010
Getting Organized
Sometimes, I could really, really just kick myself. Last Saturday was one of those times. The whole ordeal was...interesting. Oh no, not interesting as in 'Oh wow! So amazing!'. It was interesting along the lines of 'Oh my God, WHAT have I done!??!'. Only with more exclamation points.
Last Saturday... I opted to ... Alright, Moms take a deep breath before I say this. Last Saturday I opted, quite freely to...
Clean. My. Room.
AHHH!!!! OH MY GOSH! ...Yes. I did it.
Well, part of it. I only managed to clean the two worst 'corners'. Do you know what I found? Art supplies. Sketches. More art supplies. Art supply residue (Read: the little fuzzies that drop off when you cut a piece of velvet). Oh, did I say art supplies?
My room, usually looks like a craft store exploded in it. There are random bits of cloth hanging out of bags, tons of unidentifiable UFOs, beads in cases and baggies, boxes of mailing supplies in case I actually have to mail something out to someone kind enough to buy something I post on Etsy or DA, and things I can't really even explain- like the really nice case for organizing beads...that had nothing in it but dust...or that pile of colorized paperclips shaped into ...non-paperclip shapes (Dog bones, cats, little swirlies... you get the picture). I don't know why I have these things...or when I got them, they're just THERE.
So, I dumped out my art cart, drawer by drawer and found the most appalling things. Gel pens I'd gotten in high school, markers that I hadn't known I'd had and subsequently bought MORE of ...dried out, the colored ink crusted all over them, and worst of all..BEADS. I had beads EVERYWHERE. It disgusted me. When I got to cleaning out the art shelf, it was even worse. I never knew that I'd had so many supplies, just rotting from disuse or just how much I'd mismanaged my space.
Still, the hardest part was throwing it away. I kept looking at markers and other things and saying 'I really could have used this...but now it's useless'. It was even worse when it came to the beads, because no matter how many of one kind you have, you can, actually, still use them for something. Still, it was disorganized and sometimes, taking the time to pick through and sort things out makes the whole process not worth it.
In the end, I came away with a new motto! "If it's not in the right spot, I don't have a proper place for it, and the likelihood of me using it in the next year is lower than 40%, GET RID OF IT!"
On that note, does anyone want to chat about buying a Sega Game Gear and some games? What about some Inuyasha and Sailor Moon stickers? Dragon Ball Z Poster?
Thursday, October 14, 2010
My Creative Process and Motivation
The Creative Process and Motivation
Everyone’s creative process is different. Each person goes through their own little set of rituals and rigors when they decide to give birth to an idea bouncing around in their head. But they always have to have the drive to do it. A lot of normal people look for motivation from outside sources. But that’s not quite right. Motivation, comes from within, my little potato dumplings. Your motivation is your reason for acting, your purpose and your drive.
Most things we do are done out of necessity. For example, if we didn’t need to work for our necessaries, we’d bum around all day. Since we do have to work for those things, we are driven to find a steady source of income in order to survive. For hobbies, that whole drive thing is a bit different. It’s not one of the usual needs. It’s the bastard child of our species’ intelligence, creativity, curiosity, persistence, and a need for self-actualization. …Thinking about it, perhaps ‘bastard child’ wasn’t the best terminology, since puns turn the whole thing into an orgy of abstract ideas. ANYWAY, for me, everything starts with a desire- motivation and the creative process.
Stage 1: Desire

Whatever it is you plan on doing, you’ve got to want to do it. If it’s jewelry making, you’ve got to want that necklace you saw in the catalogue and you’ve got to doubly want to be the one who brings it into existence. Once you desire it enough, you’ll get the drive to do it. And if your desire is independent from wanting pats on the back or to be acknowledged for what you can do, you’ll push it to the furthest reaches of your own imaginings, success or failure.
Stage 2: Curiosity

In this stage, I’m usually curious about what I’ve seen. I want to touch it, poke it, taste it and smell it- that is if it’s edible, but usually this process just involves poking. A key part of curiosity is satisfying it. That means, reading about the topic of interest, studying it, and researching it down to the last basic detail.
Stage 3: Dabbling (What's down there?)

Here, I find myself making shy attempts at performing the basic actions required of the interesting topic. It’s never anything big, just using the notes I took while researching and applying it to one or two instances. An example would be baking cookies from scratch. I started with the most basic recipe I could find, sugar cookies. Butter, sugar, vanilla flavoring, flour and a pinch of salt. Sugar cookies. That’s it.
Stage 4: Experimenting

Once I’ve got that basic recipe/procedure/technique down, I get a little saucy, because I bore easily. Why should I ONLY make sugar cookies? What if I want Peanut Butter cookies? Or chocolate chip cookies? Or hell, what if I want smoked habanero and chocolate cookies?! Yeah, that’s where experimenting comes in. It marries stage3 with that need to be creative and sometimes, it produces beautiful results. Other times, it leaves you with little burnt lumps of something that turns to powder in your mouth.
Stage 5: Tweaking

Once you recover from that exploding ball of hellfire you gave birth to in the experimenting phase, you start to tweaking it. That requires careful examination of what you did and developing or finding a means to keep it from happening again. If your cookies burnt everyone’s tonsils out on Christmas day, you must gather the courage to go back and redo those cookies with a bit less habanero, or maybe, no habanero at all.
Stage 6: Give Yourself a Moment of Glory

What, you thought that you weren’t entitled to a little bit of gloating? Well, you are. Gloat a little. Say to yourself ‘This is the thing I created! I did this! I am AWESOME!’ whilst cackling like a mad scientist. All that is horribly important too.
Stage 7: Add Some Spice

After you’ve become savvy with your process and got a tried and true thing, it’s time to diversify. Go back to stage 2 and work your way back down here. I usually do it until I feel that I’ve expanded my skillset to a point where I can’t really expand it too much more. Soon, you’ll be creating new designs, tinkering with physics (There is some of that involved when you’re making jewelry, believe it or not), and making some mind blowing discoveries (maybe not, but it will still be pretty durn cool).
Wednesday, October 13, 2010
Holiday Boot-camp- Week 3
So, this is week…3, or something, of my holiday boot-camp extravaganza and already I’ve shown myself to be a pitiful soldier. My deadlines are becoming optional instead of mandatory. I’ve even started posting my blog later and later in the week. But don’t worry. The boot-camp has punitive torture for that, like the ‘empty wallet with nothing to show for it’ torture and the ‘Jabba, the Hutt sized piles of supplies strategically placed to trip and injure you’ torture. Believe you, me, these are tortures you never get used to. I mean, every almost-blind person needs to have a certain chaotic order in their sleeping space so that they can navigate it in the dark, right? Right? Helloooooooo… Well, I suppose you’re all busy with your boot-camp duties too. At least, I hope that’s the reason why I haven’t gotten any comments.
Anyway, I’m not going to go into agonizing detail about the horrible setbacks. But, for the sake of sating your curiosity, let’s just say that my haphazard plans and schedules bit me in the butt. Tests, fashion shows, bumming around on the interwebs instead of watching a butt-load of Attenborough dvds for my ANTH class, and not enough sleep… they were all contributors.

(Ain’t that a nifty graphic? Made it in that, there, new version of paint.)
Production Goals: Each week, I am required to make at least 5 pairs of earrings, 3 bracelets, 3 Joolry Necklaces and 2 ‘Premium’ Necklaces. If the preceding number of each item cannot be attained or maintained, I am required to spend an approximate time equivalent of 10 hours and 45 minutes (per week, ya’ll) devoted exclusively to the creation of pieces to fill the inventory by and for the holiday buying season. In the event of a test or a paper (5 pages or more) the production rate will be halved to accommodate necessary study times.
Planning Goals: Each week, I will devote, at least, 2 hours to planning designs for production during the following week. Planning the design not only involves making the design itself, but also determining what materials will be needed, procuring those materials, and determining if the item is something that can be duplicated with relative ease. The degree to which an item can be duplicated determines its premium, so this is all very important. As planning may occur anywhere at anytime, I am required to make a note of these plans in a specific notebook before my noodle-strainer of a memory loses the idea. Once the item is complete, I am required validate its quality and take pictures of it (if it meets my standards). Once the product has been named, photographed and priced, it is to be catalogued on deviantart and in the portfolio.
Maintenance Goals: I am required to conduct maintenance on both my supply inventory and product inventory. This includes taking stock of supply levels (Monthly) and keeping weekly updates to the product inventory. I am required to properly polish products upon their completion and package them in a resealable plastic baggy to prevent tarnishing before placing them in the inventory box. I will develop labels for each item to enable me to tell at a glance what is in which baggy and also keep things organized. In the near future, I would like to have a better organizing system, but for now, just improve on the one I’ve got.
Supply Goals: In addition to cataloguing my supplies, I will also keep a tight hold on my purse strings. It is important that I cease the financially detrimental habit of impulse buying and ‘collecting’ supplies. Supplies are meant to be used, consumed, or, if they don’t meet my standards, disposed of. In addition to this, I will acquire and maintain ‘staple supplies’ and keep in my largest supply box and finding bags. Staple supplies will include beads catalogued by shape and color, chains, and findings. More distinctive beads and findings will be kept in smaller cases. Damaged or unusable beads and findings will be thrown away as soon as they are located, no saving.
Pricing Goals (met): I will develop and use a standardized pricing model for my products. This model must be able to cover the cost of materials and pay me for my time. I will not jeopardize my own financial future by being nice and only pricing things at material cost. This is a hobby, yes, but it also opens options to grow and expand financially in the near future. I will treat it like a job. In accordance with this model, I will go back and reconfigure the prices for old items in the inventory to fit this pricing structure- OR begin to recycle them as ‘free gifts’ for people who have spent $200 or more. I will make my pricing structure public knowledge in an effort to rid myself of guilt when people complain about something being ‘oh so expensive!’.
Normal Wholesale Price Model for Jewelry: (Materials Costs + Labor Costs + Over Head Costs + Profit mark-up) x 2
My temporary pricing model: Materials Cost + $10.50/work hour + Overhead Costs + 20% profit mark-up
Profits will be used to build the business (getting a tax ID, getting a license, creating checking and savings accounts), hopefully getting to a level where hiring additional help is possible.
Blogging Goals (met): I will update my blog each week with at least one typed page in the following format: Arial, 12pt font, single spacing. I will include pictures for emphasis and ‘spice’.
Tuesday, October 5, 2010
Holiday Bootcamp
A couple of weeks ago, I got a secret message from Etsy.com, a call to arms, the draft letter for Holiday Bootcamp!

At first, I tried to 'dodge the draft', ignoring the summons to 'battle' because I had other commitments that are more important: school, work, church... Adding to the list would just be too much! I couldn't sign up for 'Holiday Bootcamp'. I barely have enough time for all my other hobbies like..reading non-school books, watching the webisodes of my favorite animes and documentaries and horror movies, reading manga and writing stories! Holiday Bootcamp would just be too much! It would kill me! Oh my aching schedule!

But then one day I got up the courage- or curiosity- to just...click it. Just once. Let me tell you something... it blew my addled little mind! Everything is intricately structured, there are lists and schedules and all kinds of hints and tips laid out like a Christmas feast for anyone brave enough to take advantage them. The clever snakes toyed with my curiosity! They knew that I wasn't like Eve, stupid enough to go after a plain apple. Oh... but they bated the trap well. They dipped my apple in caramel, chocolate and peanuts. It went downhill from there.
I suddenly found myself inspired, almost to a point of madness. Tons of sellers on Etsy are having little 'Pre-holiday' sales, tossing out glittering treats of jewels and precious metals, candies and fairytale lures for a fraction of the normal price. And with a mind structured like a bluejay, I cried "SHINIES!!!!" and plunged right into this hellish cycle of plotting, creating and feeling utterly bereft when the materials all run out. It leaves me feeling validated and...fulfilled, the rush of creating something sparkling and new from something old or broken has had me humming and singing made-up songs for the last week or so. And now, now I can't go back to 'civilian life'! Not EVER!
And I can do this Holiday Bootcamp thing! I can... I've seen myself do it. Just yesterday, I created 19 pairs of earrings, 6 leather/velvet/button hairclips, and 6 rings and planned out 5 fancy-style bead-woven and filigree slider bracelets... in less than 2 hours. It feels good, but it's not enough. It will never be enough! I must have MORE!
And so, I challenge you, the readers to join Holiday Bootcamp with me!
1. Take the pledge: Number 0: The Pledge
2. Construct your Mission statement
3. Join the Bootcamp on Facebook
4. Find a Bootcamp Buddy
5. Read the Articles: Number 1: Success tips, Number 2: Merchandising, Number 3: Pricing, Number 4: The Art of Bundling, Number 5: Discounting
6. List and Examine Your Most Popular Items- For yourself
7. Brainstorm Something New
8. Construct a schedule and attack plan
9. Get your rear in gear!
More updates later. Until then, stay frosty men! And check for updates: My Deviantart.
At first, I tried to 'dodge the draft', ignoring the summons to 'battle' because I had other commitments that are more important: school, work, church... Adding to the list would just be too much! I couldn't sign up for 'Holiday Bootcamp'. I barely have enough time for all my other hobbies like..reading non-school books, watching the webisodes of my favorite animes and documentaries and horror movies, reading manga and writing stories! Holiday Bootcamp would just be too much! It would kill me! Oh my aching schedule!
But then one day I got up the courage- or curiosity- to just...click it. Just once. Let me tell you something... it blew my addled little mind! Everything is intricately structured, there are lists and schedules and all kinds of hints and tips laid out like a Christmas feast for anyone brave enough to take advantage them. The clever snakes toyed with my curiosity! They knew that I wasn't like Eve, stupid enough to go after a plain apple. Oh... but they bated the trap well. They dipped my apple in caramel, chocolate and peanuts. It went downhill from there.
I suddenly found myself inspired, almost to a point of madness. Tons of sellers on Etsy are having little 'Pre-holiday' sales, tossing out glittering treats of jewels and precious metals, candies and fairytale lures for a fraction of the normal price. And with a mind structured like a bluejay, I cried "SHINIES!!!!" and plunged right into this hellish cycle of plotting, creating and feeling utterly bereft when the materials all run out. It leaves me feeling validated and...fulfilled, the rush of creating something sparkling and new from something old or broken has had me humming and singing made-up songs for the last week or so. And now, now I can't go back to 'civilian life'! Not EVER!
And I can do this Holiday Bootcamp thing! I can... I've seen myself do it. Just yesterday, I created 19 pairs of earrings, 6 leather/velvet/button hairclips, and 6 rings and planned out 5 fancy-style bead-woven and filigree slider bracelets... in less than 2 hours. It feels good, but it's not enough. It will never be enough! I must have MORE!
And so, I challenge you, the readers to join Holiday Bootcamp with me!
1. Take the pledge: Number 0: The Pledge
2. Construct your Mission statement
3. Join the Bootcamp on Facebook
4. Find a Bootcamp Buddy
5. Read the Articles: Number 1: Success tips, Number 2: Merchandising, Number 3: Pricing, Number 4: The Art of Bundling, Number 5: Discounting
6. List and Examine Your Most Popular Items- For yourself
7. Brainstorm Something New
8. Construct a schedule and attack plan
9. Get your rear in gear!
More updates later. Until then, stay frosty men! And check for updates: My Deviantart.
Tuesday, September 28, 2010
Well-made Stuff That Just Doesn't Sell
If anyone out there has ever gotten pretentious enough to take up a hobby, practice, perfect and attempt to market it, you'll understand where I'm coming from with today's post.
Every hobbyist, crafter and enterprenuer has at least one well-thought out, well-planned and most importantly, well-executed product that should have worked out to be a money maker but.. some how it just fell short. Like that kid we all went to high school with, you know the one who had the best grades, was in all the clubs and when you found them 5 years later, they were a stoner living in their parent's basement. Yeah, it's like that.


Every hobbyist, crafter and enterprenuer has at least one well-thought out, well-planned and most importantly, well-executed product that should have worked out to be a money maker but.. some how it just fell short. Like that kid we all went to high school with, you know the one who had the best grades, was in all the clubs and when you found them 5 years later, they were a stoner living in their parent's basement. Yeah, it's like that.
Well, at ACEN 2010 this year, I had come up with the bright idea to let some of my 'old stuff' go at a fraction of the price. Oh, it sold beautifully, but, some of the 'critically acclaimed showstopper' pieces, the ones I'd put blood, sweat, and tears into came up short. I, was vexed. Everyone stopped at the table, examined, inquired about and exclaimed happily at the sight of my crafts, but I barely made it away with any sort of profits. It sucked, royally. Really, the amount I spent to BE at the convention's artist's alley was equal to what I made. That's sad.
To make up for it, I tried selling items to boutiques and individuals and ended up with the same results. I came with what I brought and my pockets were lighter because I'd used bus fare to get there. ARGH! Well, Christmas is coming and hot dang it, I'm going to figure out what to do with this stuff... somehow. It's hard to get rid of. I can't give it away as gifts because everyone I would give gifts to has already seen it! But people won't buy it! I'll let you guys decide.
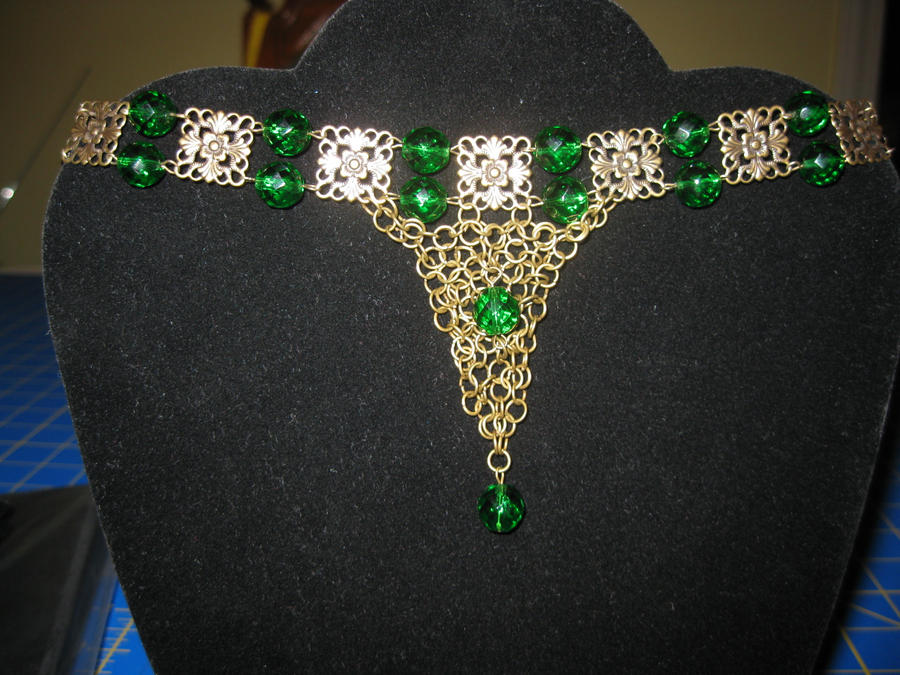
Spartan Lady
Spartan Lady
Work time: 8+ Hours
Original Price: $50 for the set
I thought it was a good price. I mean, chainmail, expensive glass beads, BRASS up the pooter and lots and lots of work! But a girl at the convention said and I quote, "OH MY GAWD!? Is this, like, seriously 50 dollars? What the hell, man!? I can find better looking stuff at other tables for cheaper!" ...I know this is mean-spirited of me, but I told her quite kindly, that she ought to go look at other tables and see if she found anything she wanted within her price range. I know she didn't, because I'd already looked. Everyone else with chainmail had much higher prices than mine. They actually found me at the end of the con and said, "...That's 50 dollars? I'd have charge 100 or more, at least. You're an artist, stop starving yourself!"
I thought it was a good price. I mean, chainmail, expensive glass beads, BRASS up the pooter and lots and lots of work! But a girl at the convention said and I quote, "OH MY GAWD!? Is this, like, seriously 50 dollars? What the hell, man!? I can find better looking stuff at other tables for cheaper!" ...I know this is mean-spirited of me, but I told her quite kindly, that she ought to go look at other tables and see if she found anything she wanted within her price range. I know she didn't, because I'd already looked. Everyone else with chainmail had much higher prices than mine. They actually found me at the end of the con and said, "...That's 50 dollars? I'd have charge 100 or more, at least. You're an artist, stop starving yourself!"
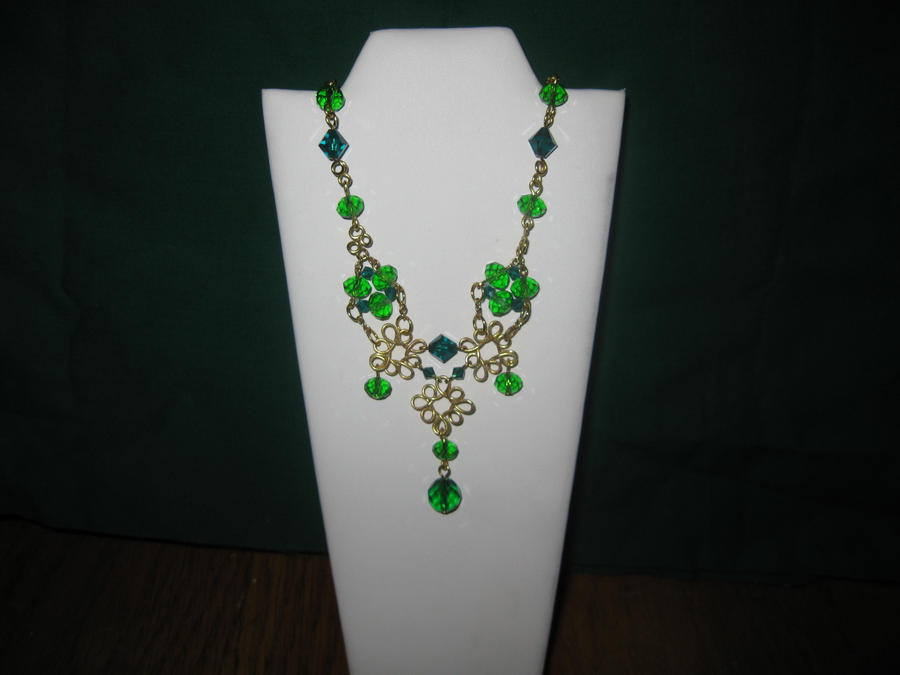
Fae Wild
Work Time: 3 hours
Original Price: $80 for the set
Materials: Swarovski Crystals, brass plated pewter wire and chain.
There's only been one person in the world that said that she'd pay the price of this item + a premium and the cost of shipping... and that poor dear doesn't have enough disposable income or the willpower to make just one 80+ dollar purchase before it will start snowballing out of control. For her, I'd lower the price because she's been nothing but sweet, supportive and enthusiastic with her encouragement for me pursuing my hobbies. That, and her boyfriend helps me whenever my computer explodes.
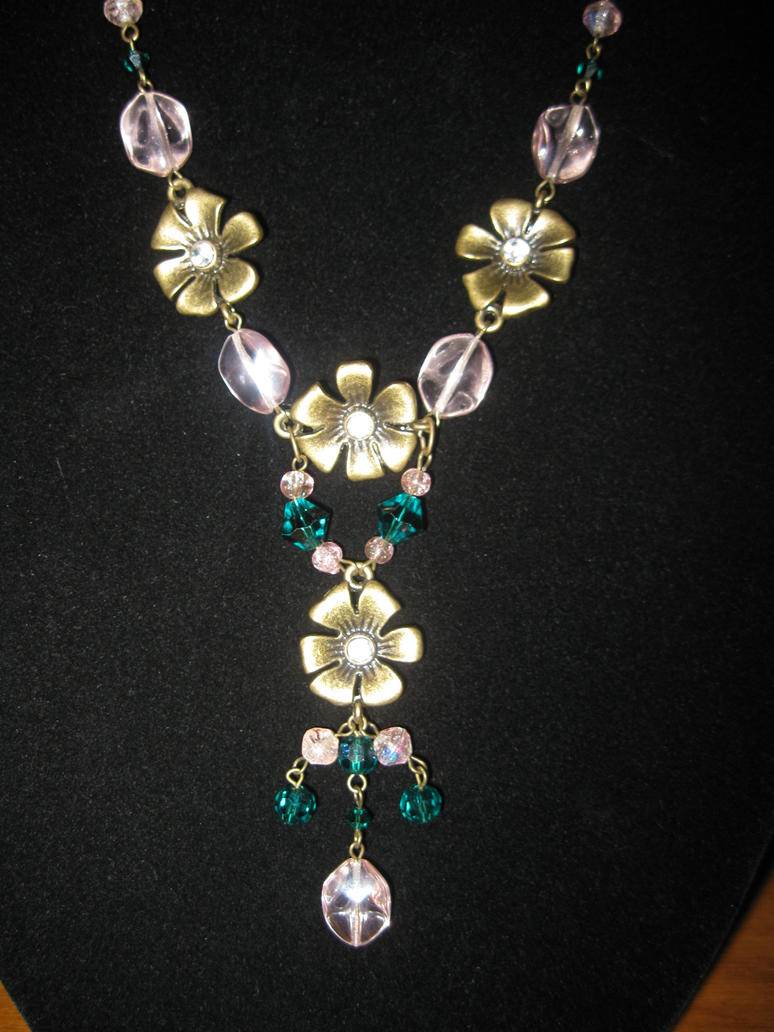
Liliana
Work time: 7 hours
Original Price: $80 for the set
Materials: Czech glass, brass, swarovski crystals and physics
I actually had one lady give me an IOU for this one, saying "Set this aside, call me and I'll bring the money and pick it up". The thing is, she never did, so in my box of Sellables it sits.
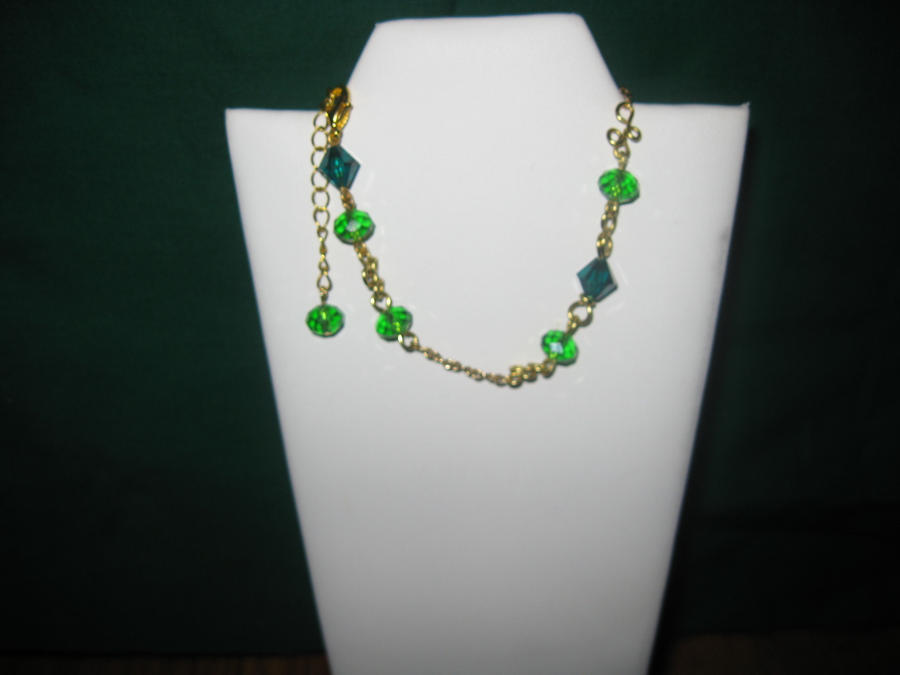
Princessa Choker and Earrings
Work Time: 4 hours
Original Price: $50 for the set
Materials: Czech Glass, Swarovski crystals, brass chain, beads and findings, fake pearls.
Now, someone bought the bracelet, but they didn't want the other parts of it and since other people who see it see that it once had a bracelet, they don't want to buy any part of it without having the bracelet too. Don't they know that they'd pay over 50 dollars for just the necklace in ANY boutique?
Boho SeaGoddess Necklace
Work time: 1 hour and 20 minutes
Original Price: $15
Materials: Moonstone, Czech Glass, Brass chain and findings
Everyone Tells me how stunning this one is, how 'striking' the moonstones are and how the colors come together brilliantly... but no one wants to pay the paltry $15 dollars to own it.
Bloody Cathedral
Work Time: 1 hour
Original Price: $20
Materials: Black woven cord ribbon, Brass chain and findings, swarovski crystals
This choker's sexy. Yes... maybe a little too sexy, MAYBE sexy enough to be the bane of its own existence. if someone doesn't pick this up, I just might. Maybe I'll get a hot date.
While you're deciding what I ought to do with these little gems, check out my mom's blog here: http://themahoganystylist.blogspot.com/
Then check out my deviantart page to see what's new and exciting!
Subscribe to:
Posts (Atom)