Okay, so, I guess I've never told you how old I am or what I do for a living. I am 23 and I am in college. I am also about to graduate. Technically, I should have graduated a year ago, but silly me, I had my rebellious phase during college and it wasn't against my parents, not really. It was against my school's bureaucracy and the series of events that led me to be a management major.
You see, I didn't want to be in the business college. Seeing my mother wrecking her brains and under heaps of stress every quarter convinced me that I didn't want to work like that. Dealing with the problems that come with doing group work and being 'group leader' in grade school told me that I never, ever wanted to be a manager. I wanted to get my bachelor's in SCIENCE. How else was I going to become a mad scientist? Alas, I'm stuck being just a step away from a dirty politician, a management major. I hate management in the corporate business sense. I'm a filthy Socialist Commy, or perhaps, I belong with the likes of Emma Goldman.
If you've played Dungeons and Dragons, you'll understand this phrase: Chaotic Good with Neutral Good leanings. In other words, I'm a motivator for change, progress and enlightenment, unafraid to work in, around and under your machine with the sole purpose of tearing it down so you can see that it's inefficient. I tear conventions down and find a way to make them better. At the same time, I love to help, even if you're my enemy. I can pity a person who doesn't care if I live or die. I can walk up to a random, injured high school kid after they've gotten jumped on by 20 people, stop them from doing the stupid thing and going after their attackers while dabbing blood off them with my ever-present wet-wipes. I know, I've done it before.
But, I'm not a manager, not in the corporate sense, or even the 'I work for the University' sense. I'm not a back-stabber, a brown-noser, or a cut-throat business person... nor do I ever want to be. It's too easy for people to slip into rationalization as a defense mechanism. I know myself. I do it too. When that guy tried to come through my apartment window, I did the rational thing. I called the police, calmly waited for them to arrive and when all was perfectly safe, a report filed, the window repaired and fitted with new bars, that's when I freaked out. In the business world, danger lurks everywhere. It mixes all of the shark-tank exploits of Wall Street with the jealousies and insecurities that some people never grew out of . The business world is like high school, but with no teachers or parents with enough clout over these grown-up children intent on ruining your life. There's no punishment for bad behavior unless it's truly illegal, and sometimes, not even then.
It would be best for me to be conditioned to that sort of lifestyle and behavior. It would be best and even beneficial for me to become a cold, over-rationalizing human-faced monster. I don't want to be that. I don't want to rationalize my guilts for selling people products that could kill them with the idea that I have 'fiduciary duties'. The other thing I don't want is this economic depression.
Yes, depression. The financial folks don't want to call it that, but we've sunk low enough, employment's in the toilet and no new advances have been made. I don't care if we don't look like we did in the depression in the 30s. People had fewer clothing items, food was cheaper and there were still jobs for unskilled labor. Here, there's nothing.
It's a dead zone if you come out of high school and your family doesn't have cash for college. Heck, it's a dead zone if you do. I don't want to be that kid in the L station with their resume strapped to them front and back, asking for a job.
I don't want to become a vagrant contemplating college as an extremely expensive mistake. I want to feel like I can make a difference in the world or at the very least be happily and comfortably successful at something I enjoy. I want to make my parents proud of what I've done with my life. That's why I fear the day's job market, my own unintentional major, and the negative possibilities that may follow. But, that's part of growing up, right?
Monday, December 20, 2010
Thursday, December 16, 2010
Feather Clip Tutorial
If you've ever searched for a glamorous and unique gift for a glamorous and unique Hairphile only to come up empty handed, or flat out broke, this tutorial is for you.
Here are the materials you'll need before you start:
Leather of moderate thickness, no thicker than 3 mm, though.
Feathers
A 1.5 inch long, undecorated snap clip.
White Dressmaker's Pencil
And here are your instructions, with pictures, yo!
Step 1: Draw oval shapes on your leather with your Dressmaker's Pencil. They should be about 2-2.5 inches long . Cut them out.

With that all wrapped up, I should probably do the Etsy Shop of the Week... Especially since I forgot to last time.

Here are the materials you'll need before you start:
Leather of moderate thickness, no thicker than 3 mm, though.
Feathers
A 1.5 inch long, undecorated snap clip.
White Dressmaker's Pencil
Scissors
Exacto-knife
E-6000 Glue
Other embellishmentsAnd here are your instructions, with pictures, yo!
Step 1: Draw oval shapes on your leather with your Dressmaker's Pencil. They should be about 2-2.5 inches long . Cut them out.

Step 2: Draw 4 horizontal lines on your oval. I use a special order to make sure I space them according to the hair clip size so that the leather won't interfer with the snap-clipping action. Draw the first line about half an inch from the top of your oval. The second line should be about 1/4 of an inch down from the first. The third should start a half inch down from the second and the 4th should be 1/4 down from the third. Easy? Easy.
 |
| The lines are faint, but there. |
Step 3: Use your exacto knife to slice along the lines with a firm and even pressure. Don't slice like you're the serial killer in a slasher flick, slice like you're the plastic surgeon working on the face of a model who retired after someone threw acid in her face. VERY carefully. You may have to repeat in order to slice completely through your leather. Be patient. Neat lines will make all the difference when you start really working with this. In the end, you should have 4, straight and even slits
 |
You can see the end of my pinky poking out of one of the slices.
|
Step 4: Unsnap your snap-clip and thread it through the slits you've made. Start with the second slit, pushing the pointed end of the clip through it. Weave it through the remaining slits much like you would weave those pieces of construction paper together in grade school to make place mats. Once finished with that part, take the rounded back end of the clip and work it up through the first slit. Adjust the clip so that it rests evenly in its leather flap. When you're done, the rounded end of the clip should poke out of the 'top' of the leather flap, while the pointed end should poke out of the 'bottom' of it. Actually the pictures for this tutorial are a little off. I was rushing. The pointed end of the clip should come out of the rounded end of the oval.
 |
| Observe as I take a picture with my shaky hands whilst gluing |
Step 5: Leave the clip unsnapped. This will keep you from accidentally gluing your clip SHUT. That'd be a bummer. Glue the rounded end of the clip to the leather underneath it. Be careful not to get glue on the underside of the clip. Now, glue the pointed end to the leather above it. Again, make sure not to get glue on the other parts of the clip. You will regret it. Press the leather against the two ends to help secure it and leave the clip to dry a bit- I usually wait about 30 minutes to an hour.
 |
| Actually, the clip should be put in the other way around. Having the rounded end of the clip at the rounded end of the oval leads to you having a face full of feathers. |
Step 6: Snap your clip shut. If it's dried enough, the leather will not snap off the ends you glued it to. If it's not dried enough, press the leather against the ends of the clip again and allow it more drying time. Start gluing on your feathers, beginning from the outer edges and working your way in. Be sure to draw even, lines of glue over the leather parts of the clip from top to bottom.
 |
| I have added the red feather. |
Step 7: Add a second layer of feathers for fullness. It's tricky to glue the second layer on. The original layer of feathers may shift. Just push them back in place. Make sure that if there are portions of the hair clip base showing that you cover those with feathers. Allow the clip about 30 minutes to dry for a bit.
 |
| I added a layer of red feathers, and then a few black ones for decoration. |
Step 8: Allow the clip about 30 minutes to dry for a bit. Add any other embellishments you want to finish off your feather clip. In this one, I used sequins and a fancy de-shanked button. Let the clip dry COMPLETELY, usually for about 10-24 hours. Now the glue has cured and the clip is wearable. Enjoy.
 |
| The finished product. I do recommend trimming any visible glue from the clip so it looks professional. This is just a quick hack job. The real clip looks MUCH better. |
With that all wrapped up, I should probably do the Etsy Shop of the Week... Especially since I forgot to last time.
This week's feature is LoverDover's, a children's dress and adult apron shop styled after the fashions of the early 20th century! The whole shop looks like it was born in the era of 'I Love Lucy', splashed through the psychedelic colors of the 70s, and tripped into a 50's diner. I LOVE IT. This is a 'definitely' for any retro housewife and/or kitchen diva. Take a look at my choice picks!
Little Red Riding Hood Dress
 |
| Cape and Blouse are sold separately in the shop. Dress comes with a little blue apron |
I Love Lucy Apron
 |
| Front |
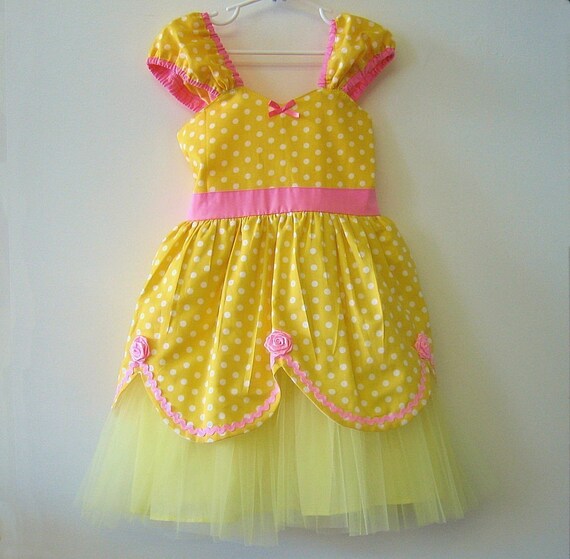
Belle Princess Dress
Thursday, December 2, 2010
Funky Stretch Bracelet Tutorial
For this week's 'episode', I'll be instructing you guys on how to make a cute bracelet worthy of gifting! All you need is some stretchy cord, bugle beads, bicone beads, stringing glue and about 20-45 minutes of your time. I know that's a big time gap, but to be honest, it takes people longer to do this sort of thing on their first couple of tries. Once you get the rhythm, Ooooooh baby, it won't take you long at all. I can actually make 3 of them in 45 minutes now.
Anyways, here we go! Take a look at your materials!
Stretchy Cord

Bugle beads

Bicone Beads

Stringing Glue

Measure a length of stretchy cord 3.2 times your desired length. Don't look at me like that, YES it has to be that long. Now, start with 4 beads in the following order- bugle, bicone, bugle, bicone.

Step 2: Move to your next row
This step is 'tricky' or so I've been told. Take the end of the string opposite your last bicone and put it through the hole of the bicone that the first string exits The result should look like this:
 If it looks like this,

you put the string through the wrong hole! Pull it back out and put it through the other hole. Pull taut.
Step 3: Continue the trend!
Place 2 beads on one strand in the order: bugle, bicone. Then place on bugle bead on the opposite strand. Work the bugle strand through the 'exit wound' of the bicone (ONLY the bicone) on the opposite strand, just like you did in Step two. Pull taut. You see how this is going? Yeah? Repeat until you get close to your desired length.
 Step 4: Finish it!
Stop a centimeter or so shy of you desired length. If you keep going, you'll have a loose floppy bracelet, not a stretchy one! Make sure the end of your chain has no bugles on the free strands. Now, place a bugle on each 'free' strand. See, that? Yes, I know I contradicted myself, but I'm doing it so you don't make the mistakes I did. Now, pull those strands through your FIRST bicone, you know, the little guy you put on between the two bugle beads at the very beginning of your bracelet! Unfortunately, I don't know how to draw that in MSPaint, so, you'll have to use your imagination.
Pull taut. Tie the strands, double, or triple knot them. Then, apply a small blob of glue for extra hold. Allow the glue to dry. Cut the excess cord as close to the knot as possible. TADA! You're done.
Note: Try using different shapes and styles of beads to get different bracelet effects. You can even make a wavy effect by using bicones of graduated sizes! Experiment with the length of your 'chain' to make rings and chokers too! Just remember, use clasps for the chokers... you don't want to strangle anyone.
Anyways, here we go! Take a look at your materials!
Stretchy Cord


Instructions:
Step 1: Place your first beadsMeasure a length of stretchy cord 3.2 times your desired length. Don't look at me like that, YES it has to be that long. Now, start with 4 beads in the following order- bugle, bicone, bugle, bicone.

Step 2: Move to your next row
This step is 'tricky' or so I've been told. Take the end of the string opposite your last bicone and put it through the hole of the bicone that the first string exits The result should look like this:
you put the string through the wrong hole! Pull it back out and put it through the other hole. Pull taut.
Step 3: Continue the trend!
Place 2 beads on one strand in the order: bugle, bicone. Then place on bugle bead on the opposite strand. Work the bugle strand through the 'exit wound' of the bicone (ONLY the bicone) on the opposite strand, just like you did in Step two. Pull taut. You see how this is going? Yeah? Repeat until you get close to your desired length.
Stop a centimeter or so shy of you desired length. If you keep going, you'll have a loose floppy bracelet, not a stretchy one! Make sure the end of your chain has no bugles on the free strands. Now, place a bugle on each 'free' strand. See, that? Yes, I know I contradicted myself, but I'm doing it so you don't make the mistakes I did. Now, pull those strands through your FIRST bicone, you know, the little guy you put on between the two bugle beads at the very beginning of your bracelet! Unfortunately, I don't know how to draw that in MSPaint, so, you'll have to use your imagination.
Pull taut. Tie the strands, double, or triple knot them. Then, apply a small blob of glue for extra hold. Allow the glue to dry. Cut the excess cord as close to the knot as possible. TADA! You're done.
Note: Try using different shapes and styles of beads to get different bracelet effects. You can even make a wavy effect by using bicones of graduated sizes! Experiment with the length of your 'chain' to make rings and chokers too! Just remember, use clasps for the chokers... you don't want to strangle anyone.
Subscribe to:
Posts (Atom)