Showing posts with label fascinator. Show all posts

Monday, February 11, 2013

Ode to a Lady: Indeed

I have made another hat, this time a bit more grand.  It's a red hat, after all.  Red hats have to be dolled up and pampered.    I began by adding a bit of lace cording to the band of the hat.

I know you can see the fluff peeking out the back. 

Indeed.
I chose to expand on mother's idea of adding netting and tulle.  While I'm not a huge fan of the stuff, it does give a nice effect and looks quite flashy when you...pleat and trim it like so.  Rather than giving unstructured body, it gives body, shading, tone and drama to what would otherwise be a plain hat with some simple embellishments on it. 

As I was preparing to put the hat together, I decided that some feathers were a must.  A bright red hat with some netting isn't very stylish. 

Hat and Design element facing forward
I tried turning the hat in a variety of directions in order to get a feel for how versatile it is stylistically.  A hat with a fancy doodad is great, but I've seen too many of them in stores that you can only wear a certain way.  I wanted to make sure that it would look good no matter how I chose to rotate it. 

Embellishments on the side with the fringe of netting hanging over the face...

Embellishments facing the back of the head
I'd say I was successful.  I like the effect of the paper flowers and rhinestones against the bright red and black iridescence of the feathers. 

Monday, February 4, 2013

Miniature Top Hat: Keeping it simple

Now that you've seen my tutorial for making a fancy little hat fascinator (If you haven't, Here You Go), I felt that I needed to put my own instructions into action and give you a little snippet of what I've done with this handy, dandy bit of knowledge.  Be aware, there aren't many pictures of this first attempt because well, it's the first try.  The first try either blows all normal conventions out of the water or is a simplistic precursor to the fantastic.

I made this hat using the 'Purchase and Decorate' method and I'll be honest, it was hard to get it started.  I'm not sure if it's just me, but when I get something ready made, it takes my brain a moment to make the leap to Creativity Land.
Courtesy of Pacroid.blogspot.com

Setting a design is always the hardest part.  It's even harder when your brain forgets that this little hat is NOT complete and needs some pizzazz.  Mine chose the moment that I needed it to create things to go on a vacation, so I borrowed mom's.  Her brain was stuck on netting and tulle.  The fluffier the better.   
It's not fluffy enough.

I wasn't so sure about this idea, even after she regaled me with photos of fancy hats decked out in fluffy stuff.  As a rule, I only like fluffy skirts, kittens and cupcake frosting.  I became a little afraid when she declared, "More tulle!  MORE!  Use the whole roll!"  But I did as she suggested.  I pleated the tulle on one side to form little lumps that remind you of one of those 1940s hairstyles and tied it into a big fluffy bow in the back of the hat, secured it with a few drops of glue.
Like this but with less film star attached to it.

I needed to tulle it up.  The hat would have been pitiful without it.  After we tweaked and poked at the hat, we both determined that it still needed something...  I decided that it needed something shiny to balance all the matte textures.  The end result was this.

Big tulle bow worn in the front. 

Big tulle bow worn on the side

The good thing is that the tulle bow feature looks great.  The bad thing is that the rest of the hat looks a little plain by comparison.  In the near future, I may add more to it...I need to go craft shopping first. 

Saturday, February 2, 2013

Hatter Madness: Tutorial 2

So, I'm sure you all remember the tutorial I did for Fascinators and hats not too long ago.  If you don't, here it is.  Well, I made that tutorial before I learned that there were other construction options available to those who don't want to devote a ton of time stitching, starching and wiring.  It seems that there are pre-made hat forms with the clips already attached available from eBay.  All you need to do is decorate them.  Well, don't that beat all?

So now you can make a nifty fascinator in less time, gathering fewer materials and without having to use every craft skill known to man- unless you WANT to.  So here you go!  Hatter Madness Tutorial number 2!

Materials:
  • 1 Mini-top hat, bowler, tricorn or high top-hat
  • Glue (Locktite or E6000) 
  • Scissors
  • Ribbon
  • Some feathers
  • Silk flowers
  • Beads and other decorations

And now the instructions.  You'll be surprised at how easy they are!

Instructions:
  1. Assemble the materials you want to use.
  2. Make a basic design arrangement for your hat.
  3. Glue the items to the hat in an order that best balances the decor and hides any unfinished edges.
  4. Allow it to dry completely (Very important.  You don't want to super glue a hat to your head)
  5. Wear it.

Tuesday, January 15, 2013

Christmas Hat

Working retail over the holidays kept me busy and tired, so I didn't go to many parties.  Let's face it, you're not going to be raising the roof with your girls if your feet hurt so bad you start thinking it might be better to live as an amputee.  No parties for me.
Knowing that I couldn't attend the Christmas shindigs or even stay in my own house to watch old Christmas movies really stung, so I was determined to make Christmas Eve fun for me- by making a hat.  An ostentatious, LED lit marvel of amateur hat-making science. 

This baby.

Let me start by first saying this: I had no idea what I was doing.  This hat is something made purely on a whim, with no prior experience besides making hair clips.  It also, very quickly, became an experiment to see how much stuff I could cram onto one small oval piece of felt without breaking my neck or having it fall off my head.  Despite this, I think it came out nicely.
I had no pattern to help in making this so I sort of followed my own mind.  It was actually fairly simple to make once I had assembled all the materials.  I'll include pictures of the less common ones.

Materials:
Two sheets of craft felt
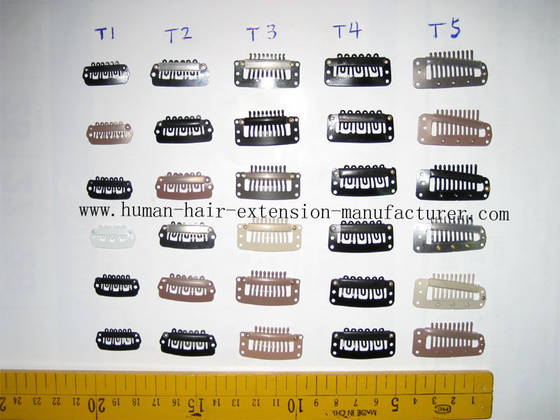
 Two Hair extension combs
Hair Extension Combs: Photo From Human Hair Extension Manufacturer.com
Beads   (Any will do)
Hem Tape
Garland
I used something similar to this
 LED tea light
Christmas Trimmings
Scissors
Wire

Instructions:
1.  Cut the felt into ovals.  They will be your hat base.
2.  Mark where you want to place the combs (it's important that they're opposite one another otherwise it will fall off your head)  Hand sew them to one of the felt ovals.
3.  Assemble your Christmas Trimmings (I got most of mine from the dollar store).  Determine the basic layout you want them in before sewing or gluing them down.
4.  Hand sew or glue (E6000 for the win!) your Christmas Trimmings to the other oval of felt. I wanted a light on my hat so I had to cut a hole so that I could reach the switch.  I also wired a little golden Christmas tree light cover to it so the naked LED bulb wasn't showing. 
5. Hand sew the two felt ovals to one another, making sure the combs and decorations aren't sandwiched between the felt layers.
6. Measure the perimeter of the felt ovals, and cut the wire to that length plus 2 inches.  Twist the ends of the wire over it to secure them so they don't poke you in the head, then shape it to fit in your felt ovals.
7. Hand sew one side of the hem tape to one side of your felt oval.  Fold the hem tape to the other side of the felt oval, tuck the wire in the fold, begin sewing the other side of the hem tape to your hat base, keeping the wire oval inside the pocket formed by the hem tape.  Complete a full circuit around your hat, knot the thread, tuck the end into a hidden spot under the hat and wear. 


It's just that easy.  Why don't you try it?