Showing posts with label FAQ. Show all posts

Monday, April 21, 2014

Skincare: Argon Shower Gel

I don't know about any of you, but I have weird skin.   I drink water, eat fruit and all that to promote healthy skin, but no matter what I do, there's always persistent dryness and random acne breakouts.  Since I was old enough to recognize that my skin wasn't perfect, I've employed an arsenal of skincare products to slather on and scrub off.

Recently, whilst in Marshall's I spied some Argan oil skincare products.  I've had great success with using Argan oil in my dry hair and on my sensitive scalp, so I thought that trying it in skincare products would probably be a great idea.  It makes my hair bouncy and shiny, so why wouldn't it make my skin silky smooth?

I tried Phytorelax Laboratories Olio di Argan bath and shower gel. 

Made in Italia.  So fancy
It was readily available at Marshall's for less than the usual $26 and looked fancy.  The 16.9 ounce bottle cost a total of $6 bucks.  That's no more than my usual, non-luxury shower gel (that's going to be reformulated because it has those fish-poisoning plastic beads in it).

Here's my assessment of this product.

Smell:
An important property is scent.  They are supposed to make you CLEAN and smell nice.  It's their primary purpose.  We wouldn't make so many kinds if that's not what they were supposed to do.  Well, the scent of Phytorelax's shower gel isn't anything special.  It isn't overpowering or especially fragrant.  It smells like chrysanthemums, so when you use it, you literally smell as fresh as a daisy.  That's nice.

Texture:
As far as shower gel textures go, this one was unexpectedly thin.  It was surprisingly watery for something so luxurious.  The lather wasn't overwhelming either.  In fact, it barely lathered up at all.  However, this is a good thing.  Things that work into a luxurious lather usually have TONS of salts and dry your skin in the worst way.  Phytorelax's formula has a lot of argan oil and plant extracts instead.  It's got tons of plant acids included as well, so it's like a mild chemical peel on top of being nourishing.

Effects and experience:
I followed my usual shower and moisturizing rituals with this shower gel.  After the first wash, I noted that it literally left me squeaky clean.  Still, there was no real change in the texture of my skin.  At least, I didn't notice it right away.  I found that my skin wasn't as itchy as it usually is.  After the third use, I noticed that some of my eczema patches started to flake off.  The resulting dark marks weren't as bad as they usually are, either.  I found that my skin didn't want as much moisturizer as it usually does and it didn't feel tight or itchy at any point in the day. 

Final Imprission:
This product will leave your skin cleansed and refreshed with just a hint of fragrance and extra moisture.  It doesn't smother your skin with harsh chemicals, salts or silicones.  That limits the amount of irritation you'll suffer later.  While I love how the product made my skin behave and feel after a few washes, I really wish there was a bit of exfoliant in it so I could use it on my feet like I use my regular shower gel.  I'm cautious to complain about it because it did a great job with handling my skin issues, despite not having all the 'perks' my old shower gel has.  I think I'll try tweaking it a bit with some ground avocado seed to increase it's exfoliating power in the future.  We'll see how that goes. 
Until then, give it a try.  You might like it.

Wednesday, March 12, 2014

Miasma Necklace

Stringing has got to be the easiest and most ancient of all the jewelry making methods.  You only need a couple of things to complete a stringing project.  It's simple.  Even the most primitive and ancient of cultures has strung beads of some sort.  Furthermore, stringing gives rise to all other forms of beading.

Just 3 steps.
Obtain String and Bead.
Thread String Through Bead
Tie Off string.

Borrowed from Who Does These Things blog.

The simplicity of strung jewelry makes the whole process VERY zen-like.  You have repetitive motion, repeating patterns, and a small simple task to focus on.   In no time, you have a beautiful, enchanting piece at your fingertips, like this one.  

BAM!  In your face!  Look at those beautiful purple resin swirls!

This particular necklace is one of the few times I've used acrylics to create a jewelry piece.  I tend to stay away from plastic beads because they feel kind of...cheap.  However, recently, Jesse James, Darice, and Blue Moon have been producing high quality acrylic beads.

It's a simple pendant with a slightly tribal feel.

Would you wear it?

Monday, February 17, 2014

Things That Look Like Other Things

You all know that I like things that look like other things.  If you don't know what I mean, here's some examples:  I used to have a flash drive that looked like a purple monkey.  I have a ton of erasers that look like realistic food.  I have a pin cushion that looks like a hat when you look at it from one angle and like sushi rolls from another.  I have a candle that looks like a spool of thread... And I like visually ambiguous patterns.

You can see where this is going.  Yup.  Jewelry making.  Did you know, that they have all kinds of dolamite and other stones that are artificially enhanced to look brighter and richer?  Did you KNOW that they have a whole host of beads and charms that look like cakes, fruit, and other things?  No?  You'd better hit up eBay and Etsy, then.  Just type in something ridiculous and attach 'beads' as a suffix.  You'll see some things. 

About a year ago, I started searching for and acquiring all sorts of these 'strange' beads.  The results were bright, flashy and candy inspired jewelry pieces that are positively adorable... and ridiculously HARD TO SELL!  It seems like I'm the only adult who likes this sort of stuff.  Ah well.  I did get some good photos of these things before I got rid of them or packed them away.

Let There Be CAKE! 

Just a Cherry Key Fob.

I love these things.  I ended up keeping them for selfish reasons.

These used to be shank buttons.

Such Sparkle.

Each strawberry is a locket.  I wish I still had this one.

I love how you can get polyclay slices of fruit these days.  Super easy to use!

This one reminds me of Tang. 

Thursday, February 6, 2014

Bookoo

About a week ago, I received a message from a Bookoo representative, Kellin Smith.  Apparently, they are looking to promote their new Chicago branch.  I was quite surprised, of course, but I opted to reply to the message with some questions.  I'd never heard of Bookoo before.  Naturally, being a curious little ferret, I asked Mr. Smith lots of questions.

First off, Bookoo is a garage sale style listing site for artisan crafts and other goods.  Unlike craigslist, it primarily trades goods and services.  There's no job listings and very few ponzi scheme listings that tell you how you can make up to $400 dollars per day selling widgets and policies to other people.  It's easy to navigate and you don't have to filter as much because there's less spam. 

Here's how the short interview went down. 

How long has Bookoo been active as an organization?
     About seven years. The owners started Bookoo in Texas. As it kept expanding, they moved to Illinois to be closer to family.

What sorts of transactions does it support, besides online 'garage sales'?
     You can post about online yard sales, you can also list items of service, items to trade, and wanted ads.

Does Bookoo have any special features for crafters or artisans?
    You are able to offer the service of "$5 painting of whatever" or something like it.
Are local artisans benefiting from Bookoo now that it has come to Chicago?
     It is a site where they can go to showcase their work. If someone is interested in one of their items, they can see more items from that seller.
Will Bookoo ever host any offline special interest fairs or outdoor events that local artisans can participate in?
    Occasionally we do a Bookoo summer picnic. 2013 we did one for Aurora, Oswego, and Naperville. Last year we did just a big Bookoo picnic and invited all the nearby sites.
Are there any other reasons to be excited about Bookoo besides the ability to list items for sale?
    It's free! We don't charge members to post items. Also, we keep it family friendly by blocking profanity and deleting inappropriate items.
Does it support applications like paypal?
    No, the members interact with each other and usually pay cash.
What's your role in it?
    I am a marketing intern. I work full time doing whatever Adam and Austin need me to do. Most of the time it's spreading the word about Bookoo to our newer sites!


So there you have it.  Bookoo allows you to list FOR FREE.  You can offer goods and services.  You can rest assured that you won't have to deal with people seeking sexual favors after seeing you post photos of a fabulous scarf you made, and, there's the possibility of you being able to go to a picnic in the summer.  I know a lot of artists trade services and such between each other.  Bookoo could be another way for us to all network.  Check it out, try it out and send me a message about what you think.

Wednesday, January 29, 2014

Knowing Your Friends: A Theorhetical Guide For Gift Giving.

Many people have trouble picking gifts for their loved ones.  You have to figure out if so-and-so is still into this thing or that thing.  Gift-giving requires a lot more brain-power than we're used to.  You have to relate past events, decipher a person's behaviors and common motives in order to get something good.  That takes effort.  People don't like EFFORT.  Each year, I'm sure that tons of women get gifts of scented bath things, gift cards to decidedly 'girly' stores, jewelry or something else that makes people state proudly that 'buying for women easy'.  What a joke.


....yay.

Buying for women is the same as buying for guys.  Still it's a lot easier than people think- IF you pay attention.  That's the key to never forcing someone to feign joy over a pitiful gift ever again.  Pay attention to what they like.  Take note of what they get excited over, what they talk about, what they use often, and what they haven't already bought for themselves.

A few years ago, my friends and I took a vow to never buy the 'typical' go-to gifts for women for each other or anyone else ever again.  So far, it's been a success.  No one gets jewelry, knick-knacks, fragrances or lotions unless it's something really cool that they haven't heard about yet, or it's a fragrance that we already know the recipient likes.  Nothing is returned to the store, no sad faces appear at our holiday parties, and we, as a group, get the best gift that can be given: frequent heart attacks brought on by the terror of unexpected shrieks of excitement. 

You're happy, but we need a better way to express it.


The fact that we pay attention to each other's likes and dislikes isn't just a way to ensure we get the perfect gift.  It also forces us to have a better and deeper understanding of each other as people.  We have to listen to each other, observe each other's moods, and share in each other's favored activities even if it's not something we'd pursue on our own.  We're face-to-face with each other's differences and we learn appreciate every single one. 

It breaks barriers that we didn't realize were there and makes us stronger as a group.  We share our triumphs, trials and embarrassments.  We aren't caged by self-doubt or suffering in silence, because we're aware that there's someone who will listen and help without judgment. Or... you know, we could all just be crazy.


I don't think we're crazy.  I honestly think we've got a good thing going.  Our interests are reaffirmed by our peers.  We're constructively and actively listening to each other.  Most importantly, the people we share our lives with are willing to be HONEST with us when we're wrong and supportive when we're not.

Since Valentine's Day is coming up, take this into consideration before you buy someone a lame card, those God-awful chocolates, or worse, some uncomfortable chaffing underwear that's more for you than them: Any holiday that is about LOVE, APPRECIATION, and CARING should only include gifts that are purchased with the goal of making the recipient happy.


All photos courtesy of Google images.

Friday, January 17, 2014

Recovering

It has been a long, long time since I posted.

I haven't been crafting very much at all but it's not completely due to lack of trying

A few years back- right when I graduated college, I began experiencing severe neurological symptoms spanning everything from migraines to temporary blindness.  The doctors couldn't diagnose me because the damage wasn't severe enough to alter my blood chemistry or leave scarring.

As frustrating as being swept under the medical umbrella term Idiopathic Neuropathy was, it wasn't a complete condemnation.  There was a chance that it would never, ever bother me again.  For a while, I only had to deal with with occasional pain and migraines, but even those were bearable.

Last year, around this time, I began to relapse.  The migraines weren't as bad, but the other symptoms were much worse.  I will admit that I was terrified.  Seizures and nerve misfires, no matter how mild, are scary, scary things.  They represent a loss of control over your own body that...well, let's say it has a way of making you feel very small, helpless and insecure.

I had thought that because the symptoms were so bad a diagnosis was imminent.  It wasn't.  ONCE AGAIN, the doctors were unable to concretely determine what was wrong with me, despite aggressively using my arms as pin cushions, having me do physical therapy, and looking inside my skull at least 3 times.  All they were able to do is palm off a heap of medication to keep me from devolving into a pitiful, convulsing wreck.

The medication is mostly to manage my symptoms and keep me from acquiring a more immediately serious secondary condition.  Muscle spasms and Raynaud's phenomenon aren't that big of a deal.  Having your CNS shut off blood to your major organs because it's less than 70 degrees outside kinda is.  I'd like to avoid internal organ damage. 

Since I'm feeling a little better, I'm doing my best to get reacquainted with my old loves: crafts.  Hopefully, I'll remember to post often enough for anyone who still reads this. 

Friday, November 30, 2012

Hair Care Part 2: Deep Conditioning

So I mentioned in my last post that I'd take you all on a walk-through of my hair care routine.  I'm not feeling up to writing a long, metaphor laden preamble, so I'll get right to it.

It all starts with a comb:
I always start by thoroughly combing my hair.

 It helps removes tangles, dead hair, and aligns the hair shafts nicely.  This is important because you don't want to FIGHT with your hair while detangling.

The Conditioning:
I start by conditioning my hair.  Yes, before I even wash it.

This time I used Fructis
 I usually put a 'cheapo' conditioner on my hair right before I got to bed.

A huge glob of it, but this isn't even enough.

When you sleep, your body opens up all its pores.  Sleeping with conditioner on your head is an opportunity for your hair to suck in some additional moisture.

But seriously, this is starting to look gross
And I still need more...


I usually put enough conditioner to fully coat my hair from root to tip because, well, my hair's DRY.  It needs every drop of moisture.  As it sucks in all that extra moisture, it starts to curl quite nicely.

Hair, this is what you could be...if you weren't so UNRULY.

It's even pretty like this, too bad curls are so hard to maintain.  I tried letting my hair be itself for a while, but I only managed to keep it neat and cute looking for about 3 days.  After I've fully coated it, I put it in a bun, like so.

And then I put one of those thin plastic shower caps on it so I don't ruin my pillows


The Washing:

When I wake up, I rinse out all of the conditioner, which has dried over night.  The result is a very lively head of hair.  But we are not done.  I still haven't WASHED my hair.  So, I wash my hair with a mild shampoo, usually 2-3 times, depending on how I feel about it.  You know when your hair needs extra attention.  If you've been sweating at a gym all week, it needs to be washed THOROUGHLY.  You do not want any nasty crap left on your hair when you put the good conditioner on it.

The Second Conditioning:
Remember what I said about using good products to take care of your dry hair's moisture needs?  I condition with Moroccanoil intense hydrating hair mask.  This stuff is full off all kinds of natural botanicals, healthy oils and proteins for your dry, damaged hair. 

Good Product
It's as thick as vegetable shortening too.  If you have less dry hair, or your hair is straighter than mine, DO NOT USE the intense hydrating mask.  It will weigh your hair down and make it look lank and stringy.  Use the 'light' or 'weightless mask' by Moroccanoil. You'll get all the moisture, but you won't look like you waded through an oil slick.


Moroccanoil is very specific about HOW you should be using their product.  On the jar, it states that you should comb the product through your wet hair.  DO THIS.  I've found that when I just glob it on there, not all of my hair is thoroughly conditioned.   In fact, some of it feels just as dry and crusty as it did before.  So, I comb it through with a nice, wide-toothed detangling comb, like a good little girl.  I let it sit on my hair for 1-2 hours, usually under one of those salon style dryers if I can manage it.  Heat helps to open your hair's pores up again and seals in the moisture.  In this case, it's a good thing.

The Rinsing:
Finally, I carefully rinse my hair so that I get all of the hair mask out.  Then, I gently massage the Moroccanoil oil treatment or intense hydrating cream into my hair as a leave-in conditioner and let it drip dry.  My end result is this: shiny, bouncy, waves of curls.  Isn't it pretty?

Until I bust out my iron comb and straighten it, that is.

My next post will be about a crafting project.  I swear.  I've got my mojo back!


Wednesday, November 28, 2012

Hair Care for Black Girls

Not to leave any of my non-African American readers out, but this post is for those of us born with the iconic, kinky, curly and downright untamable nappy hair!  Hair has long been seen as a woman's crowning glory and everyone wants the luxury or at least the ability to grow a full head of healthy hair.  Sadly, that seems to be difficult for African American girls.  I have seen some heads in some sorry states: over processed, thinning from sew-in, glue-in, braid-in weaves that stress folicles, poor hair care practices and insane levels of breakage.
A child with traction alopecia

I've seen girls with actual bald spots, patches of hair so dry and brittle that running a comb through it means it's not there any more.  It's not just teens with their whacky fashions or older women going through 'The Change'.  It's epidemic.  Children have these problems.  It shouldn't this common.  I find it disturbing when people MARVEL at the fact that I have hair passed my shoulder blades and it doesn't look like broom straw.
I tried to get to the ah... root of the problem.  A large part of it seems to be a combination of ignorance, laziness, and the kind of miserly behavior that often leads to people with a fancy looking object that will not last long.  African American women and girls don't seem to have access to the basic fundamentals necessary to properly clean, condition, and care for their hair.  I'm not saying that folks should abandon their beauty routines, but they need to make some changes.
As a child, my mother ALWAYS stressed the importance of conditioning and properly washing your hair.  As a result, I've developed a set of rules that work for ME.  As we all know, sometimes long, thick hair is a blessing of nature and there's nothing you can do to make your genetics change overnight.  But here are some basic rules that you should follow to help ensure you have the healthiest hair you can have.

 1. Your hair is alive.  Pay attention to its needs to keep it healthy.
People sort of forget this.  Just because you want to get a relaxer this week, doesn't mean your hair feels the same way.  Touch your hair, if it feels crunchy or brittle, it's dry and needs extra moisture.  If it's limp and shiny, it needs less moisture.  If you have a lot of split ends, you need to trim it before they creep all the way up to your scalp and damage the hair permanently.  You need to make sure your beauty routine is built with your hair in mind.  If you deny it what it needs, like a good significant other, it will leave you.

2. Spend Some Money on Good Products.
Not all hair care products are created equal.  Chances are if you're only paying $5 for your shampoo and conditioner, they're filled with harsh alcohols, drying agents and sulfates.  African American hair can't really afford to lose moisture to poor hair care products.  Try a sulfate free shampoo (It's going to cost you) that includes natural plant extracts to cleanse and nourish your hair.   The same goes for conditioners.  Often times the one that makes your hair smell like berries and sunshine doesn't nourish it the best.  I've found that the best conditioners include natural oils.  The only problem with using these products is you'll have to wash your hair more often.  Natural oils have the tendency to go rancid.  You don't want to stink. 

3. Be Gentle to Your Hair.
Chemical treatments, coloring, heat-styling, blow drying, teasing and hair spray all take their toll on hair.  But the way you handle it when you wash, comb and sleep on it also play a part.  My mom always tells me to comb my hair out before I wash it, to be careful not to tangle it when I wash it and to be extra careful and patient when combing it out before wet styling.  Wash your hair like you wash your panty hose or how you lather up a sponge.  Squeeze and release it while it's full of soap so you don't tangle it.  Wash your scalp too.  Massage it gently to help break up dandruff and clogged pores so new hair can grow in full and healthy.  Do not yank your hair.  Always comb starting from the tips and work your way up to the roots.  Remove harsh tangles with your fingers to avoid ripping out your hair.

4. Deep Condition and Air Dry as Much as Possible.
Deep Conditioning is when you let your hair soak in the conditioner for more than 2 hours.  It's a pain to sit around with a wet head, wrapped up in saran wrap, but trust me, it works wonders on your follicles.  You'll notice an immediate change, even if you use a cheapo conditioner.  Air drying also helps your hair to regain some of its natural vigor.  With blow drying, the oils and moisturizers from your good conditioner get blasted right off it, leaving it dryer and more naked.  For the sake of expedience, sometimes you have to blow dry your hair, but when you can, give your hair a break.  Spend a day inside and catch up on chores instead of getting ready to do a ton of running.

And that's it, pretty much.  Check out my next post for my personal deep conditioning routine.  


Sunday, November 25, 2012

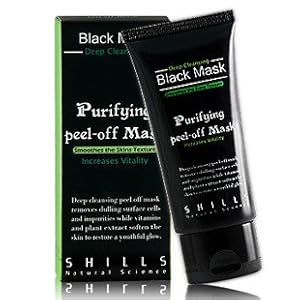
Product Review: Shills Black Mask

A while ago, I was hunting for some sort of remedy to help with my skin's sudden tendency to explode with nasty cystic acne and I stumbled upon a sort of facial mask that peels off and apparently purifies.  The product is created and marketed by Shills an Asian beauty company.
Many Americans are insanely enamored with Asian countries and practically scream, "OOOH ASIAN PEOPLE!!" like poorly educated otaku in crappy cosplay.
But not Sailor Bubba, his Cosplay's ALWAYS Awesome!
Knowing this, I was skeptical of the reviews that read like a dating column for a mail order bride instead of detailing an experience with the actual product.  But hey.  I've got nothing to lose, so I bought a tube.
Price:
With any product one of the first things that folks look at is the price of the item.  No one wants to shell out an arm and a leg for something that may or may not work.  The cost of the Shills Black Mask was pretty reasonable considering its a facial in a tube.  Only about 3 bucks with free shipping.

Appearance:
The outward appearance of the product was pretty basic.  An all black box, and all black tube, a slip of paper inside detailing the ingredients in the product and what each of them does.
 ...Written in Gothic-style type face befitting a horror movie poster.  Should I really be using this?  Is the real cure for my bad skin or a rabid vampire leaping from the bottle and gnoshing on my neck?  Hmm...

Upon squeezing out the product on my hand, I found that it looked a lot like ...tar.  It was THICK and I mean thick.  I've used peel off facial masks before and all of them have a viscous, sticky texture that dries to a slightly stretchy film.  This stuff was in  a category all its own.  First off, it was BLACK.  When you read the package, you expect something that's dark colored, possibly semi-transparent, but no.  This stuff is as blacker than the bottom of the Mariana Trench at midnight.  It was also VERY sticky, literally strong enough to stick my fingers together.  How was I supposed to get it on my face?!  ...Luckily I managed,  with these results!
Looks like Black-Face not a purifying mask!
Final Review: Well, I didn't experience any extreme skin changes like all the folks posting macro photos of millions of gross blackheads attached to the shills mask, but it was very benificial nonetheless.  My skin was SO SMOOTH, my pores weren't as clogged, the blemishes that remained dried up and flaked off, AND alarmingly, my dark spots were a lot less dark.  I also learned that you should never get this stuff in your eyebrows unless you want to lose them when you peel it off.  My whole face felt like it had been plucked!  Ow!
At least I won't have to get my eyebrows waxed now. 

Thursday, April 7, 2011

Biznizzy Bizniz Business

I have always had a passion for visual arts.  I draw, I write, and I make jewelry.  If that doesn't scream "PASSION FOR ART!"  I don't know what does.  But anyway, I digress.  Since noticably developing my skills in my crafts, I've heard a lot of commentary.  I mean, A LOT of commentary.  And for each bit of unnecessary dialogue, I have my very own mental response.

 For Drawing:
1.  Why don't you get a JOB doing this?
There's a several good reason for that.  For one, I'd have to find a job doing that.  Secondly, I'd have to be really, really good, which I'm not yet.  Third, if I got a job doing my hobby, suddenly it wouldn't be a hobby and therefore, less fun.
2.  Why don't you draw like you're Black?
Um...WHAT?!?  How do you 'draw like you're Black'?  How do Black people draw? If you mean those super stylized paintings with the faceless black people dancing around, that's not drawing like you're black.  That's the STYLE of that particular artist.  I already 'draw like I'm black' because I am considered black already.
3.  Why do you only draw an-ee-may?
I don't draw anime.  I don't.  In order to draw anime, you have to have a contract with an animation studio.  I don't have one of those.  While I used to try to mimick the anime STYLE, I moved away from that in favor of drawing characters with different faces.  It's all experimentation.
4.  Why don't you write a comic book?
Writing comic books is HARD.  First you have to write the story, then you have to figure out the storyboards and thumbnails.  Then you have to- you know what.  We'll leave it at 'It's a lot harder than it looks'.
5.  Why won't you take my commission for Sailor Moon in catgirl form getting gang-raped by Mario, Luigi, Sailor Mercury and a tentacle monster?
No.  Just...NO.

For Writing:
1.  Why don't you get it published??
Publishing is HARD.  It's all smiling and butt-kissing and royalties and contracts.  Besides, to get something published it has to be an original work, an attractive read for the publishing company, a potential moneymaker, and it has to be finished.  DUH.  If I've only finished two of the stories I've ever written, and they're CRAP, there's no way I'll get Published.  Although, looking at Stephanie Meyer's stuff...I'm starting to think I might be able to...
2.  Will you write me a story?
No.  Write your own.  I am not going to write something for someone and have every little thing getting poked and prodded at UNLESS...You pay me. 
3.  Why don't you write fanfiction for this *insert show/movie/book*?
Fanfiction is about writing about what you enjoy.  If I don't like your fandom, I probably don't enjoy it, have never heard of it, or don't like it enough to invest a lot of time in writing a whole fanwork for it. 
4.  Are you going to be an author?
Technically, I already am.  I AM authoring this blog aren't I?  Hur hur hur.

For Jewelry Making:
1.  Can you make me something like *insert designer item*?
Sometimes, yes.  Most times, no.  See, the thing with designers is that they have copyrights.  On top of their copyrights, they have access to resources, tools, skills and a workforce that I don't have access to.  Maybe the reason I refuse to make that item is because I CAN'T.
2.  Why don't you make things like what they have in *insert catalogue*?
I don't like copying other people's stuff.  Why would I copy their stuff?  Also, See the above answer.
3.  Why don't you make that in *insert color*?
Sometimes you can only get materials in one color.  Sometimes you can get it in two.  Most times, if it comes in more than one color, I don't get it in more than one color because I'm NOT GAINFULLY EMPLOYED.  I can't afford to just go buying materials in every color just because I feel like it.  Also, I don't like every color all the time.  My muse is fickle like that.
4.  Are you going to be a designer?
I don't think so.  Design jobs are notoriously hard to get, hard to keep, and revolve around building relationships within a certain field.  Since I don't know anyone in fashion, not really, I can't expect becoming a designer to be easy.
5.  Why can't I get something like that thing you made for so-and-so?
Usually no.  Why?  Because I use things that are somewhat uncommon.  Most of my really eyecatching materials are either the by-product of an art or sculpture student's projects, or pieces of really old, broken jewelry.  Most times, you can't find duplicates of those things.
6.  Why would you make that??  No one's going to wear it!
I don't get this one a lot, actually, but it has happened on occasion.  The person in question can never see a use for what I've made until I get fed up with not being able to sell it and take to wearing it myself.  Suddenly, they want one just like it.  This statement is something I really hate.  "Why would you make that?" ...The same reason I make anything..  It makes ME feel good.
Tuesday, March 8, 2011

Get Yourself Cuffed

Fashion is evolving!  You've got to be BOLD!  Make a statement!  Get yourself CUFFED! 


YES!!  Wait...No.  Not like that!  You're doin' it wrong!
As promised, my lovelies, a tutorial, a collection of knowledge based on my trial and error and expensive wasted art supplies, immortalized for your sakes, upon the internet.  Cue mad-scientist cackle.  I must warn you, however, that the process can be a bit messy and that most of the time you'll spend on this project shall be spent preparing your materials.  Shall we begin?

Materials
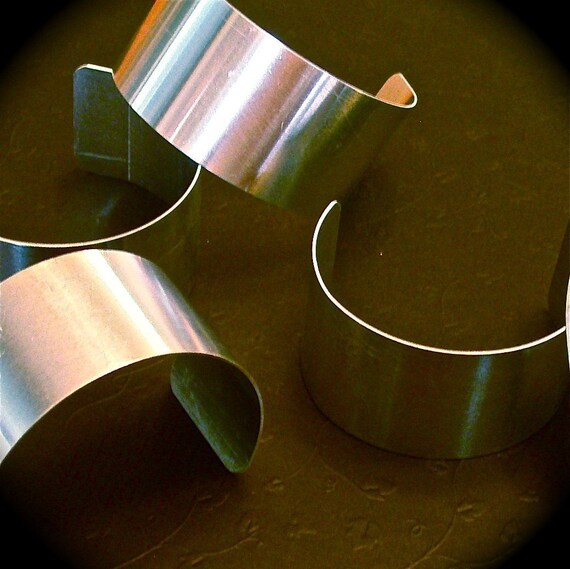
1 Unfinished Aluminum cuff blank
1 Nail File or some sandpaper (any grade)
1 Toothbrush
1 Surgical/contractor's mask
1 Pair of Goggles (high school science class type)
1 Damp Towel
E-6000 Glue
1 Pair of Latex gloves
Proper Ventilation (Fan + Open Window)
Fabric
Additional Embellishments (optional)

Instructions
1. Safety:  Make sure you have your goggles and mask fitted snugly on your face.  Open the window and turn on your fan.  Make sure the fan blows towards your work, but away from you. This is important.  Filing causes little metal flakes to become airborne.  They can get into your lungs, slice tiny microscopic holes in them and cause a lot of internal damage.  You also don't want them getting into your eyes.  Your skin will be fine though.

2.  Filing:  Begin filing your cuff blank with the sandpaper or file.  Use firm, even strokes.  I recommend a circular motion to get the most texture to your cuff without making your fingers cramp. File/Sand the inside outside, and edges of the cuff.

3.  Brush: I used a toothbrush, but a horsehair brush or a terry cloth rag will work as well.  You'll want to clean off the metal dust clinging to your newly textured cuff so that it's clean and smooth for when you work with the glue.

4.  Cut:  Measure your cuff blank.  Cut your fabric to about 1 inch + the length of the cuff and 1/2 inch + the 2 x width of your cuff.  for example, I used the 1.5 inch wide cuff bands, so I measured fabric 8 inches long and 3.5 inches wide.  This sounds unimportant or silly, but there's a reason for it. 
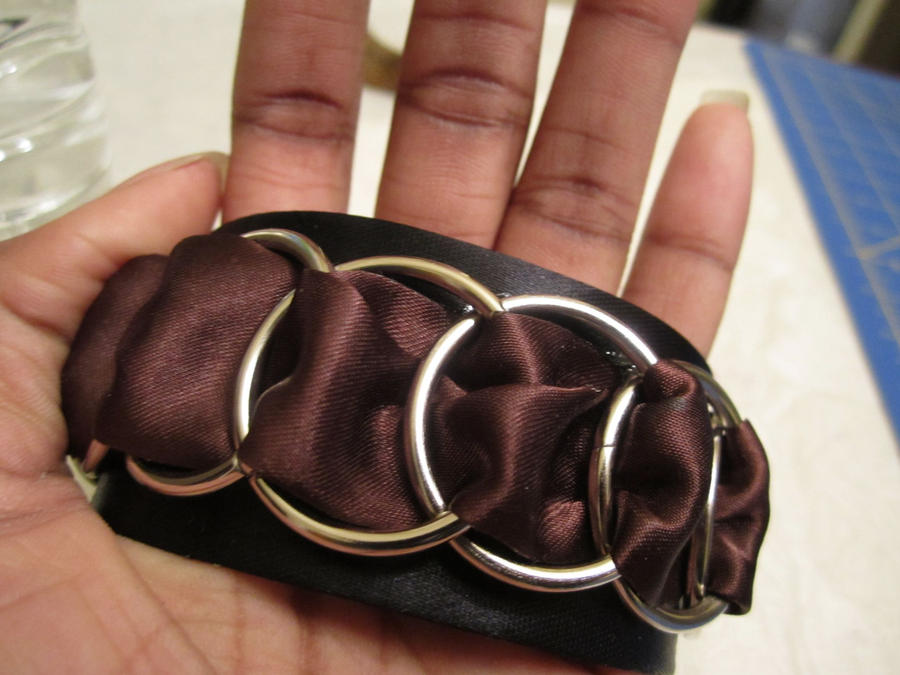

5.  Glue: Gluing takes place in 3 steps.  I say three steps because you'll need to pause to give the glue some time to set a little before moving on to the next one.  If you don't wait, the fabric will slide around as you try to cover the cuff.  Also, use your damp towel to clean your fingers and the cuff off in case you get glue where you don't want it to go.  This is a must.  Gluey fingerprints can RUIN a bracelet.
  1. Take your E6000 glue and make a horizontal line down the center of the back of the cuff (aka: the part that will be against your wrist when wearing).  Draw another line of glue across the top edge of the back of the cuff.  Attach the fabric to the cuff, lining up the bottom edge against the center glue line.  Smooth the fabric down evenly.  Allow the cuff to rest for 30 minutes.
  2. Draw a line of glue horizontally across the center and ALL of the edges visible at the front of the cuff.  Smooth the fabric over.  Allow the cuff to rest 30 minutes.
  3. Draw a line of glue on the bare edges on the back of the cuff.  Draw another horizontal line down the center of the cuff.  Lay the remaining fabric over the back of the bracelet and smooth it down securely against the center glue line. 
6. Finishing the Edges:  This is the part I had the most trouble with.  I tried sewing, gluing it down, and even just cutting it off.  All methods proved disastrous.  Then, I talked to someone who works with leather jewelry on deviantart.  They finish the edges of the leather with rubber sealant.  This is what you'll be doing but you'll use E-6000 glue.  Place a couple dabs of glue inside the little pocket formed by the fabric on each end of the cuff.  Try to get it as close to the actual end of the cuff blank as possible.  Fold the fabric back over.  Use your fingertips to squeeze the glue blobs like a toothpaste tube, working it towards the opening in the fabric pocket.   

7.  Allow the cuff to dry overnight, trim the excess fabric.  Embellish as you see fit.  Allow the cuff a couple more days to fully set.

8.  Wear it.

Now, Check out some Cuff bracelets that I made!


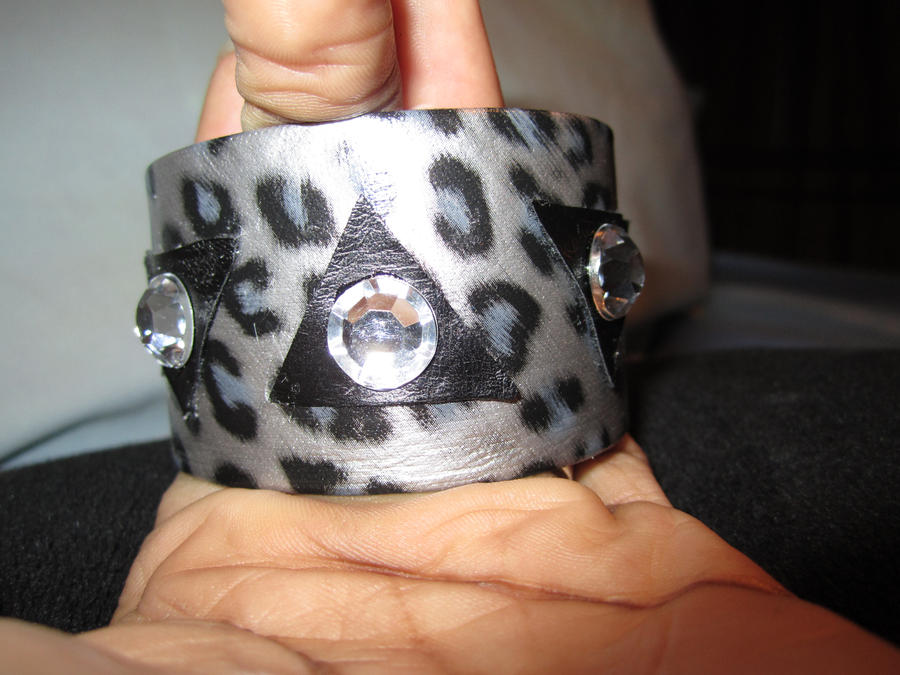
Wild Side: The very FIRST cuff I made.  Leatherette is a great starter fabric.  It's easy to work with, stays where you put it, and looks neat no matter how sloppy you were with putting it together.

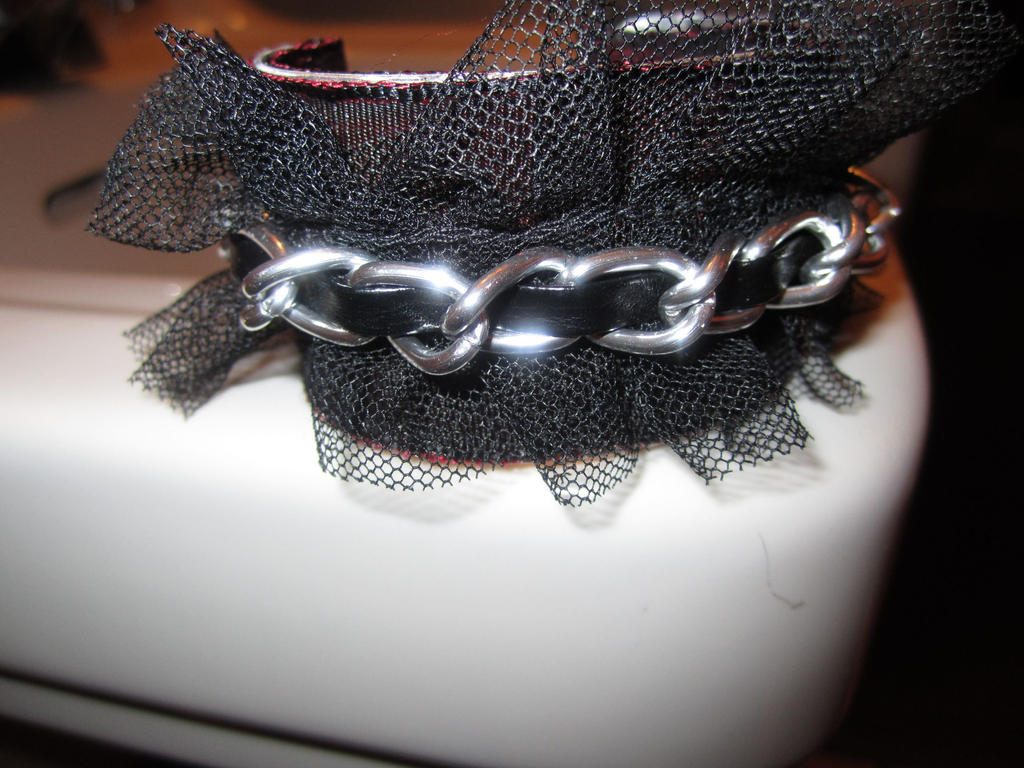
Prowl: Made with tafetta ribbon, mesh, leatherette and chain.  I was feeling adventurous.


Dark Magic Cuff.  It's made with Satin, which is a beast to work with.  I had to give this one time to dry COMPLETELY before I could work with it any more.  Satin is a very temperamental fabric.

Lion Tamer: One of the best cuffs I made.  I was trying to get something more regal and classic.